กระทู้ ESP32 EP.2 วันนี้จะขอเสนอเนื้อหาการใช้งาน ESP32 กับ web dashboard ครับ …. ด้วยปัจจุบันเป็นยุคของ IoT ดังนั้นงาน IoT จะต้องทำงานกับ web dashboard เท่านั้น ซึ่ง ESP32 + web dashboard ก็เป็นไปได้ 2 แบบครับคือแบบ local กับแบบอยู่บนอินเทอร์เน็ตใน server จริง
ตัวอย่างหน้าตาของ dashboard
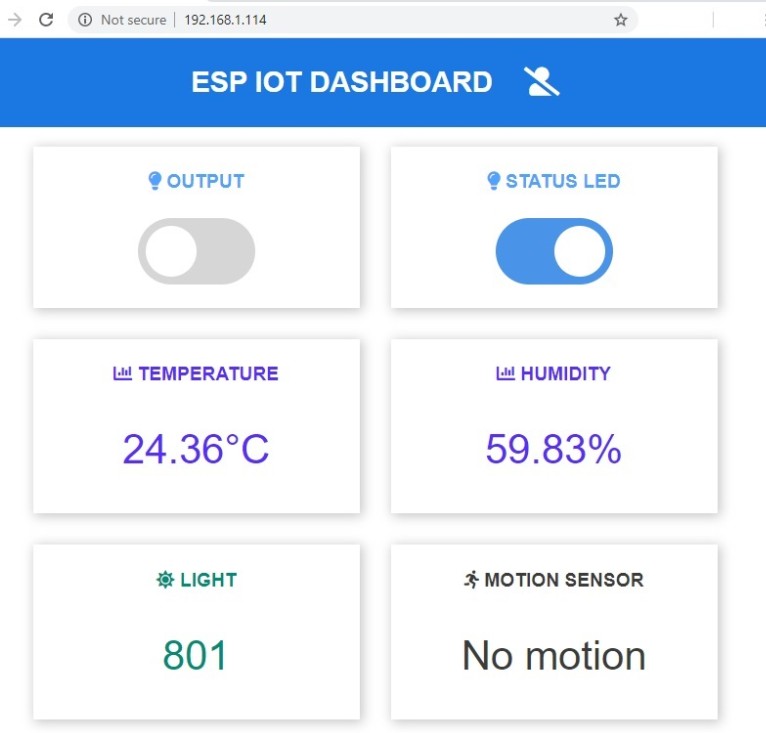
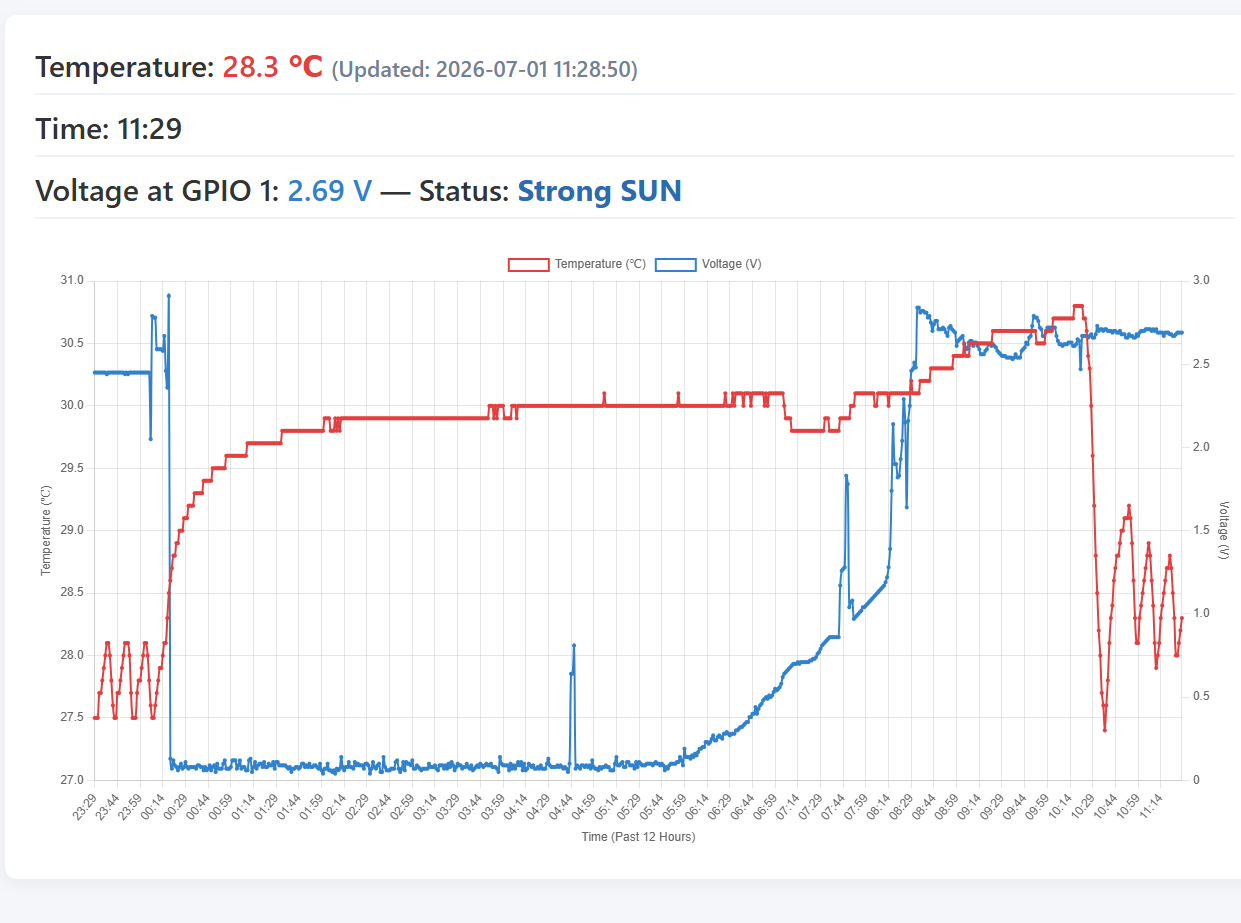
ในกระทู้นี้จะเป็นรายละเอียดของการที่จะให้ ESP32 ทำการ host dashboard เอาไว้ทั้งดุ้นและให้ PC หรือมือถือเข้าถึง dashboard เพื่อดูข้อมูล sensor หรือควบคุม GPIO ของ ESP32 ครับ
การเชื่อมต่อระหว่าง ESP32 กับ PC/Notebook และมือถือสามารถทำได้หลายแบบ การเชื่อมต่อที่ดีที่สุดก็คือหากที่บ้านของท่านมี Wi-Fi router ก็เชื่อมต่อแบบในภาพด้านล่างนี้ครับ
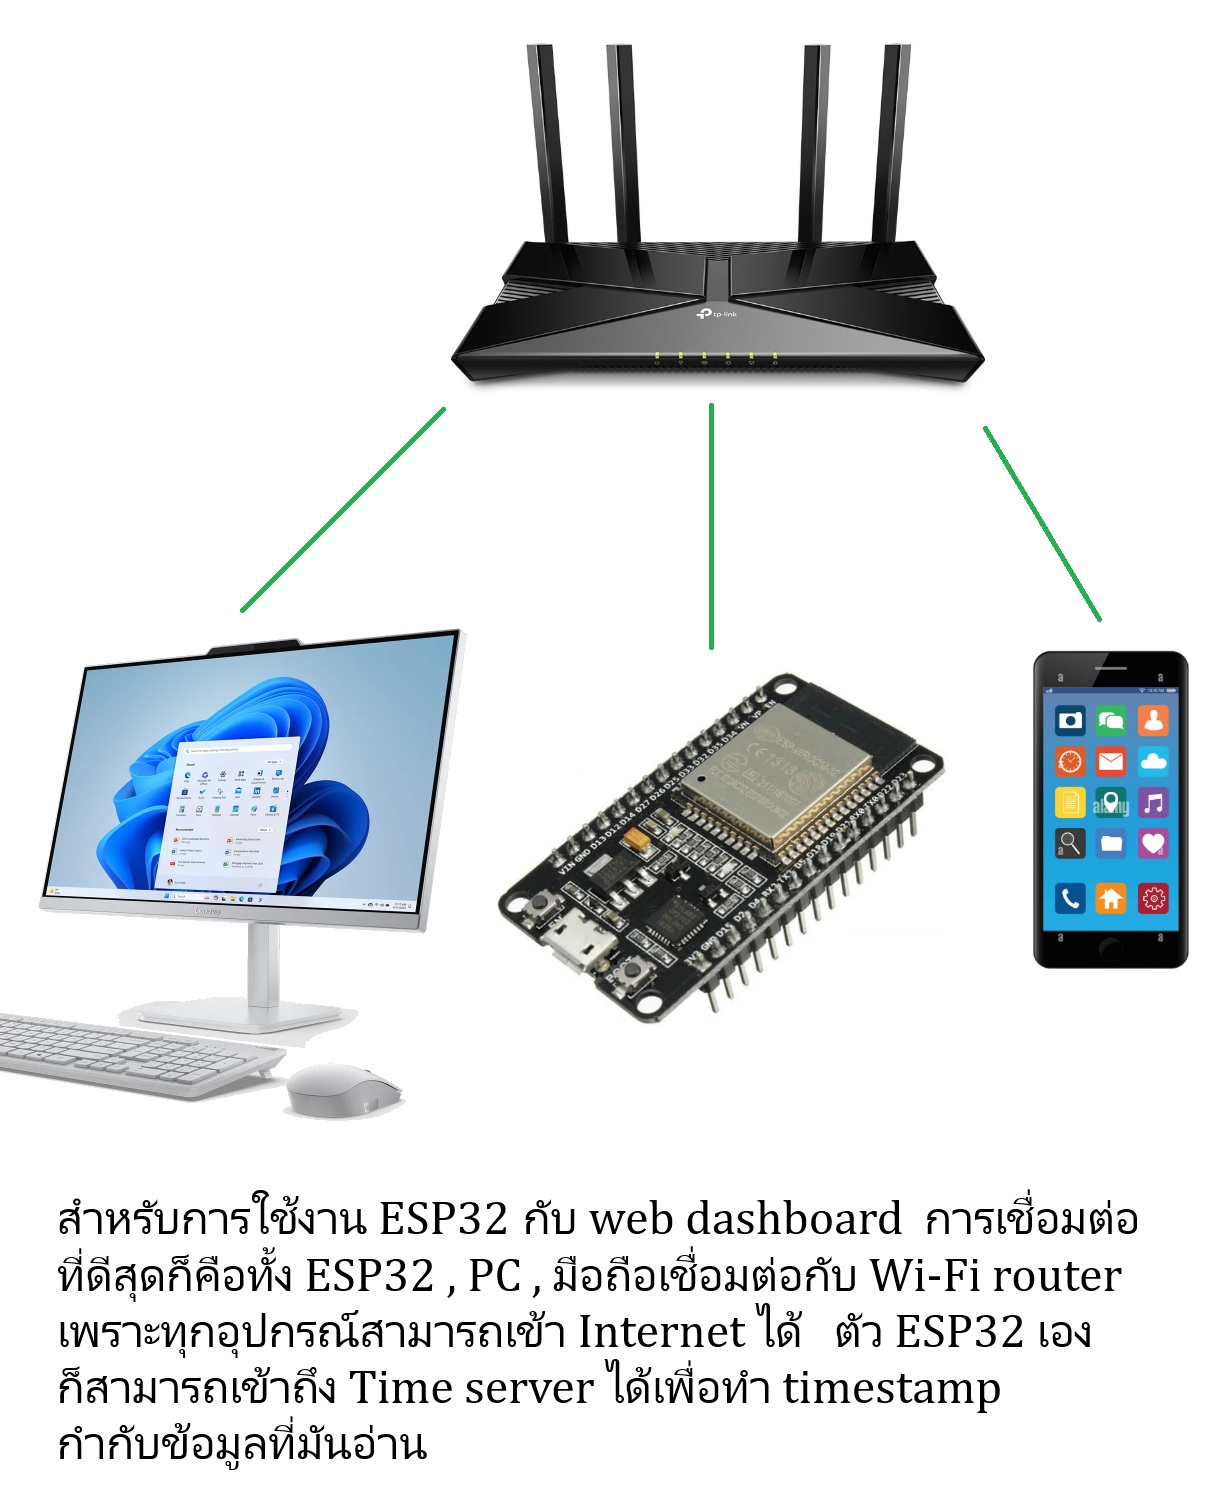
แต่หากที่บ้านไม่มี Wi-Fi router หรือออกนอกบ้าน/ไปทดลองที่อื่น ก็ใช้เพียงแค่มือถือกับ ESP32 แค่ 2 อย่างเท่านั้น และใช้มือถือปล่อย Wi-Fi hotspot รายละเอียดตามภาพล่าง

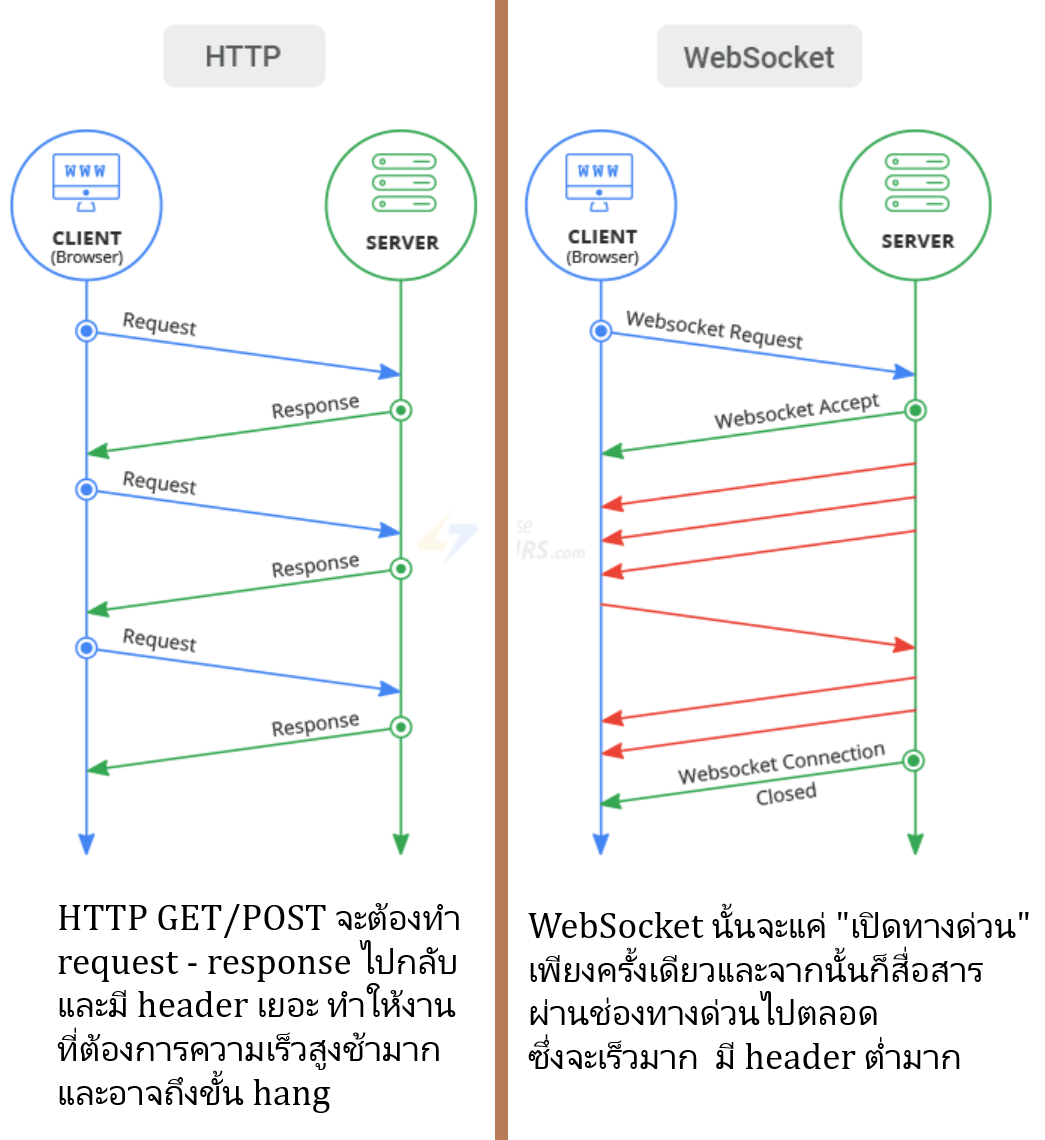
การสื่อสารระหว่าง ESP32 กับ web dashboard นั้นผมขอกล่าวถึงพื้นฐาน “Protocol” ก่อน คำว่า protocol หมายถึง “วิธีการ” ที่ dashboard สื่อสารกับ ESP32 ซึ่งในโลกอินเตอร์เนตในเวบต่าง ๆ นั้นจะใช้วิธีการ HTTP GET/POST ซึ่งวิธีนี้เป็นการรับ/ส่งข้อมูลเป็นรายครั้ง เช่นส่ง/รับครั้งเดียว , วินาทีละ 1 ครั้งหรือส่งข้อมูลหลายครั้งใน 1 วินาที ซึ่งถ้าต้องการความรวดเร็วมากกว่านี้อาจจะมีปัญหาได้เพราะ HTTP GET/POST จะมี header เยอะ (อาจมากถึง 2 – 3 KB) ซึ่งการรับส่งข้อมูลเพียง 10 – 20 bytes เทียบกับขนาด header 2,000 – 3,000 bytes …. นี่แหละที่ทำให้วิธี HTTP GET/POST เกิดปัญหาหากต้องการส่งข้อมูลหลายครั้งใน 1 วินาที
ดังนั้น ทางออกการใช้ ESP32 + dashboard ที่ตอบสนองรวดเร็วคือการใช้ Asynchronous web server + websocket ครับ เพราะ websocket จะเปรียบเสมือน “ทางด่วน” ที่จะเปิดช่องรับส่งข้อมูลระหว่าง ESP32 กับ web dsahboard และการรับส่งข้อมูลด้วย protocol แบบนี้จะมี header น้อยมากเพียง 4 – 8 byte ทำให้รับส่งข้อมูลด้วยความเร็วสูงได้ดีครับ
ส่วน Asynchronous web server ….
ขอกล่าวย้อนไปถึงการทำงานของ web server ทั่วไปก่อน ก็คือ web server ทั่วไปแบบ synchronous ก็คือจะต้องทำงานได้งานเดียวในแต่ละครั้ง ส่วนงานอื่น ๆ จะต้อง “รอ”ก่อน ซึ่งจะทำให้เกิดปัญหาสำคัญก็คือใน web dashboard จะต้องมีการแสดงข้อมูลต่าง ๆ เป็น real time และถ้าเรากดปุ่มใดใน dashboard เพื่อควบคุม GPIO อาจจะเกิดปัญหาการสะดุดหรือล่าช้าในการควบคุมได้
ดังนั้นในปัจจุบันนี้มาตรฐานการ Code สำหรับ ESP32 จะใช้ Asynchronous Web Server +websocket เท่านั้น ซึ่งสามารถแก้ปัญหาการ “รอ” ได้ทั้งหมดเพราะมันจะใช้ความสามารถของ dual core CPU ของ ESP32 ทำ 2 งานได้พร้อมกัน นั่นก็หมายความว่าแม้ dashboard ของเราจะมีการรับข้อมูลหรือกดปุ่มสั่งงาน GPIO ที่ยุ่งยากซับซ้อนและรวดเร็วแค่ไหน ทุกงานที่เราทำก็จะเป็นอิสระแก่กันหมดไม่มีการรออีกต่อไป
สำหรับ project นี้ที่จะสาธิตให้ดูก็เช่นเคยแบบกระทู้ที่แล้วครับ ก็คือจะใช้ AI เขียน code ให้ทั้งหมดเพียงแค่เราเขียน prompt ให้ถูกต้องและบอก AI ให้ละเอียดว่าให้ใช้วิธี asynchronous web server + websocket ในการ code …. AI ก็จะเขียน code ด้วยวิธีนี้ให้เรา ในการใช้งานกับจะต้องใช้ library สำหรับ asynchronous web server websocket ด้วย
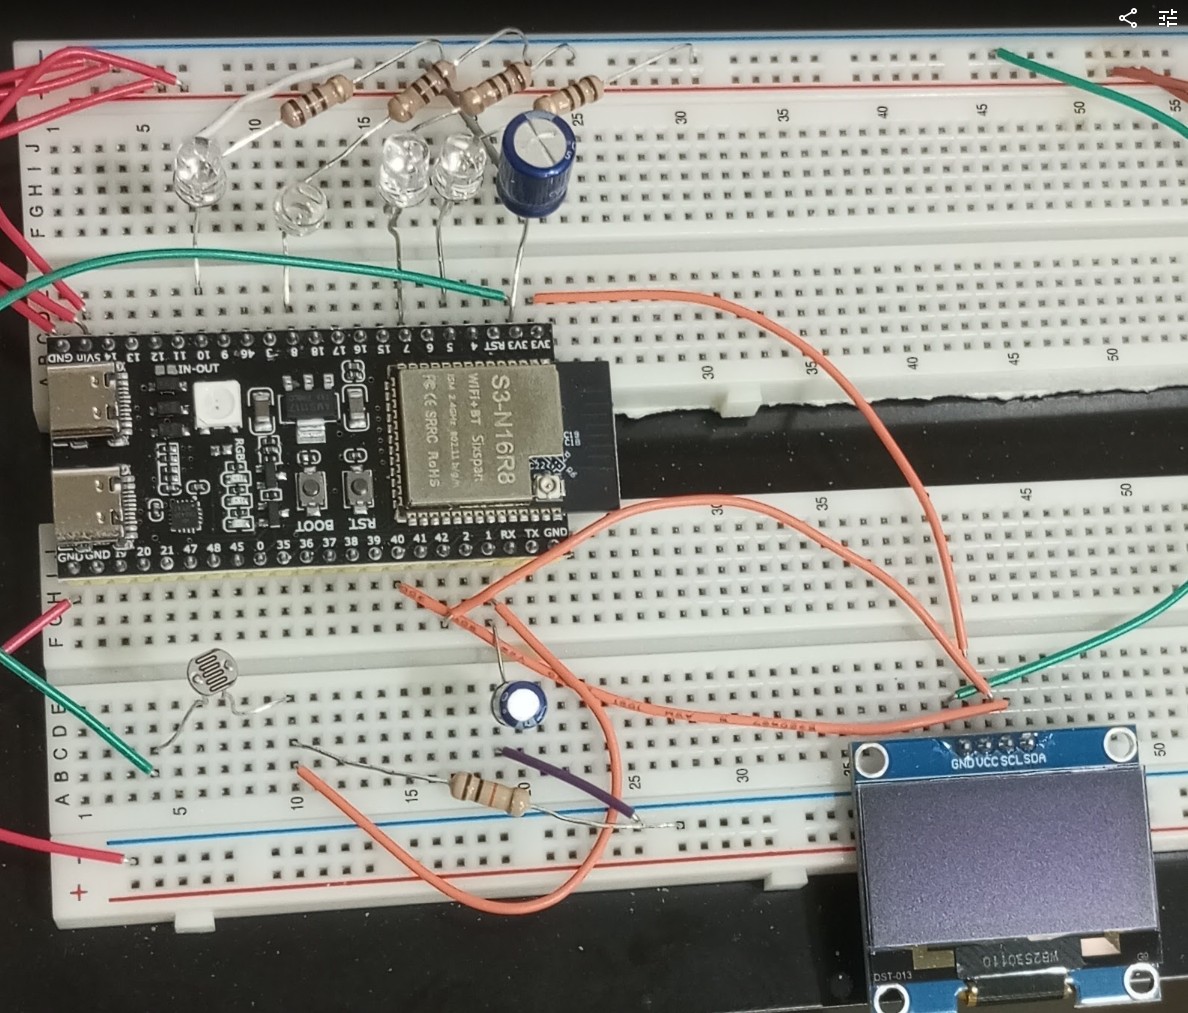
ในคลิปนี้สังเกตที่หน้า dashboard จะมีปุ่มควบคุม LED อยู่ 5 ปุ่มก็คือปิด/เปิด LED 4 ดวงและปุ่มสุดท้ายคือทำให้ LED ทั้ง 4 ดวงวิ่งเป็นไฟวิ่งครับ ในส่วนที่ 2 จะมี slider สามารถปรับความถี่ของไฟวิ่ง และส่วนที่ 3 จะเป็นการแสดงค่าความสว่างซึ่งผมใช้ LDR กับตัวความต้านทานมาทำเป็น voltage divider เพื่อให้ได้แรงดันไฟที่เหมาะสมที่จะป้อนเข้า GPIO 1 ซึ่งตัว LDR ผมก็วัดค่าความต้านทานจริงของมันตามสภาพแสงในห้อง เพื่อจะได้คำนวณให้ได้แรงดันที่เหมาะสมและใน code ก็สั่งให้ map ค่าแรงดันช่วง 1.9 ถึง 3 โวลต์ที่ GPIO 1 นี้ให้เป็นค่าความสว่าง 0 ถึง 100% ครับ
Code ของ project นี้
#include <WiFi.h>
#include <ESPAsyncWebServer.h>
#include <AsyncTCP.h>

// WiFi Credentials
const char* ssid = "NT91124G";
const char* password = "911928TOT";

// Pin Configurations
const int ledPins[4] = {5, 7, 8, 10};
const int ldrPin = 1;

// State Variables
bool ledStates[4] = {false, false, false, false};
bool runningMode = false;
int runningFreq = 5; // Default 5 Hz
unsigned long lastLdrReadTime = 0;
unsigned long lastLedStepTime = 0;
int currentRunningStep = 0;

// Web Server and WebSocket instances on port 80
AsyncWebServer server(80);
AsyncWebSocket ws("/ws");

// HTML/JS Dashboard Source
const char index_html[] PROGMEM = R"rawliteral(
<!DOCTYPE html>
<html>
<head>
    <title>ESP32-S3 GPIO Dashboard</title>
    <meta name="viewport" content="width=device-width, initial-scale=1">
    <style>
        body { font-family: Arial, sans-serif; text-align: center; margin:0; padding: 20px; background: #f4f6f9; color: #333; }
        h1 { color: #2c3e50; margin-bottom: 25px; }
        .container { max-width: 500px; margin: 0 auto; background: white; padding: 20px; border-radius: 12px; box-shadow: 0 4px 10px rgba(0,0,0,0.1); }
        h2 { font-size: 1.2rem; border-bottom: 2px solid #eee; padding-bottom: 8px; margin-top: 25px; text-align: left; color: #34495e; }
        .grid { display: grid; grid-template-columns: repeat(2, 1fr); gap: 12px; margin-bottom: 15px; }
        button { padding: 14px; font-size: 1rem; font-weight: bold; border: none; border-radius: 8px; cursor: pointer; transition: 0.2s; background: #e0e0e0; color: #555; }
        button.active { background: #2ecc71; color: white; }
        button#btn-run { grid-column: span 2; background: #3498db; color: white; }
        button#btn-run.active { background: #e74c3c; }
        .slider-wrapper { margin: 20px 0; text-align: left; }
        .slider-label { display: flex; justify-content: space-between; font-weight: bold; margin-bottom: 5px; }
        input[type=range] { width: 100%; height: 8px; border-radius: 5px; background: #ddd; outline: none; -webkit-appearance: none; }
        input[type=range]::-webkit-slider-thumb { -webkit-appearance: none; width: 20px; height: 20px; border-radius: 50%; background: #3498db; cursor: pointer; }
        .bar-container { background: #eee; border-radius: 8px; height: 25px; width: 100%; overflow: hidden; position: relative; margin-top: 10px; }
        .bar { background: #f1c40f; height: 100%; width: 0%; transition: width 0.1s ease; }
        .bar-text { position: absolute; width: 100%; text-align: center; top: 3px; font-weight: bold; font-size: 0.9rem; color: #222; }
    </style>
</head>
<body>
    <div class="container">
        <h1>ESP32-S3 Dashboard</h1>

        <h2>Part 1: LED Controls</h2>
        <div class="grid">
            <button id="btn-0" onclick="toggleLed(0)">LED 1</button>
            <button id="btn-1" onclick="toggleLed(1)">LED 2</button>
            <button id="btn-2" onclick="toggleLed(2)">LED 3</button>
            <button id="btn-3" onclick="toggleLed(3)">LED 4</button>
            <button id="btn-run" onclick="toggleRunning()">LED running</button>
        </div>

        <h2>Part 2: Configuration & Sensors</h2>
        <div class="slider-wrapper">
            <div class="slider-label">
                <span>Running Frequency</span>
                <span id="freq-val">5 Hz</span>
            </div>
            <input type="range" id="freq-slider" min="1" max="20" step="1" value="5" oninput="updateFreq(this.value)">
        </div>

        <div style="text-align: left; font-weight: bold; margin-top: 15px;">Light Level</div>
        <div class="bar-container">
            <div id="ldr-bar" class="bar"></div>
            <div id="ldr-text" class="bar-text">0%</div>
        </div>
    </div>

    <script>
        let gateway = `ws://${window.location.hostname}/ws`;
        let websocket;

        window.addEventListener('load', initWebSocket);

        function initWebSocket() {
            console.log('Connecting to WebSocket...');
            websocket = new WebSocket(gateway);
            websocket.onmessage = onMessage;
            websocket.onclose = () => setTimeout(initWebSocket, 2000);
        }

        function onMessage(event) {
            let data = JSON.parse(event.data);

            // Sync LED States
            for(let i=0; i<4; i++) {
                let btn = document.getElementById(`btn-${i}`);
                if(data.leds[i]) {
                    btn.classList.add('active');
                } else {
                    btn.classList.remove('active');
                }
            }

            // Sync Running Button
            let runBtn = document.getElementById('btn-run');
            if(data.running) {
                runBtn.classList.add('active');
                runBtn.innerText = "Running: ON";
            } else {
                runBtn.classList.remove('active');
                runBtn.innerText = "LED running";
            }

            // Sync Slider Frequency
            document.getElementById('freq-slider').value = data.freq;
            document.getElementById('freq-val').innerText = data.freq + " Hz";

            // Sync LDR Horizontal Bar
            document.getElementById('ldr-bar').style.width = data.ldr + "%";
            document.getElementById('ldr-text').innerText = data.ldr + "%";
        }

        function toggleLed(index) {
            websocket.send(JSON.stringify({action: "toggle_led", value: index}));
        }

        function toggleRunning() {
            websocket.send(JSON.stringify({action: "toggle_running"}));
        }

        function updateFreq(val) {
            document.getElementById('freq-val').innerText = val + " Hz";
            websocket.send(JSON.stringify({action: "set_freq", value: parseInt(val)}));
        }
    </script>
</body>
</html>
)rawliteral";

// Send unified system status package via JSON string
void broadcastStatus() {
    // Map GPIO 1 Voltage reading (1V to 3V target map to 0-100%)
    // ADC on ESP32 S3 yields 0-4095 over ~3.3V attenuation configuration default
    uint32_t analogRaw = analogRead(ldrPin);
    float voltage = (analogRaw / 4095.0) * 3.38;

    int lightPercent = map(constrain(voltage * 100, 100, 300), 100, 300, 0, 100);

    String json = "{";
    json += "\"leds\":[" + String(ledStates[0]) + "," + String(ledStates[1]) + "," + String(ledStates[2]) + "," + String(ledStates[3]) + "],";
    json += "\"running\":" + String(runningMode ? "true" : "false") + ",";
    json += "\"freq\":" + String(runningFreq) + ",";
    json += "\"ldr\":" + String(lightPercent);
    json += "}";

    ws.textAll(json);
}

// WebSocket Event Handler
void onWsEvent(AsyncWebSocket *server, AsyncWebSocketClient *client, AwsEventType type, void *arg, uint8_t *data, size_t len) {
    if (type == WS_EVT_DATA) {
        data[len] = '\0';
        String msg = (char*)data;

        // Very lightweight parsing to prevent JSON library dependency crashes
        if (msg.indexOf("toggle_led") > 0) {
            int idxIdx = msg.indexOf("\"value\":") + 8;
            int ledIdx = msg.substring(idxIdx, idxIdx + 1).toInt();
            if(!runningMode && ledIdx >= 0 && ledIdx < 4) {
                ledStates[ledIdx] = !ledStates[ledIdx];
                digitalWrite(ledPins[ledIdx], ledStates[ledIdx]);
            }
        }
        else if (msg.indexOf("toggle_running") > 0) {
            runningMode = !runningMode;
            if(!runningMode) {
                // Revert control straight back to explicit button states
                for(int i=0; i<4; i++) {
                    digitalWrite(ledPins[i], ledStates[i]);
                }
            }
        }
        else if (msg.indexOf("set_freq") > 0) {
            int valIdx = msg.indexOf("\"value\":") + 8;
            runningFreq = msg.substring(valIdx, msg.indexOf("}")).toInt();
            runningFreq = constrain(runningFreq, 1, 20);
        }
        broadcastStatus();
    }
}

void setup() {
    Serial.begin(115200);

    // Setup Pins
    for(int i=0; i<4; i++) {
        pinMode(ledPins[i], OUTPUT);
        digitalWrite(ledPins[i], LOW);
    }
    pinMode(ldrPin, INPUT);
    analogSetAttenuation(ADC_11db); // Ensures parsing capabilities up to ~3.1-3.3V range

    // Connect to WiFi
    WiFi.begin(ssid, password);
    Serial.print("Connecting to WiFi");
    while (WiFi.status() != WL_CONNECTED) {
        delay(500);
        Serial.print(".");
    }
    Serial.println("");
    Serial.print("Connected! IP Address: ");
    Serial.println(WiFi.localIP());

    // WebSocket Configuration
    ws.onEvent(onWsEvent);
    server.addHandler(&ws);

    // Base Dashboard Rule Route
    server.on("/", HTTP_GET, [](AsyncWebServerRequest *request){
        request->send_P(200, "text/html", index_html);
    });

    server.begin();
}

void loop() {
    ws.cleanupClients();
    unsigned long currentMillis = millis();

    // 1. Periodic 300 ms LDR sampling and status sync
    if (currentMillis - lastLdrReadTime >= 300) {
        lastLdrReadTime = currentMillis;
        broadcastStatus();
    }

    // 2. LED Running Sequencer Logic
    if (runningMode) {
        unsigned long stepInterval = 1000 / runningFreq;
        if (currentMillis - lastLedStepTime >= stepInterval) {
            lastLedStepTime = currentMillis;

            // Turn off all pins for step cycle sequence preparation
            for (int i = 0; i < 4; i++) {
                digitalWrite(ledPins[i], LOW);
            }
            // Sequentially trigger single target active frame
            digitalWrite(ledPins[currentRunningStep], HIGH);

            currentRunningStep = (currentRunningStep + 1) % 4;
        }
    }
}
ใช้อุปกรณ์เพียงเท่านี้
กระทู้นี้ขอจบเพียงเท่านี้ก่อน ส่วนกระทู้หน้า EP.3 จะว่าด้วยเรื่องของ Sensor พื้นฐาน + การทำงานกับ ESP32 ครับ
กระทู้นี้เป็นการเชื่อมต่อระหว่าง ESP32 กับ dashboard แบบ local ก็คือเชื่อมภายในวง Wi-Fi เดียวกันในบ้าน …. ในกระทู้ต่อไป (EP.4) จะสาธิตการใช้งาน dashboard ที่อยู่บนอินเตอร์เน็ตจริง ๆ ครับ (Apache web server) ก็คือเป็นลักษณะของการแสดง dashboard ในมือถือเพื่อให้เราดูข้อมูลต่าง ๆ ในบ้านและกดสั่งงานอุปกรณ์ไฟฟ้าที่บ้านผ่านมือถือได้ไม่ว่าเราจะอยู่ที่ไหนบนโลก