ESP32 (EP.4) ESP32 กับ dashboard + แจ้งเตือนผ่าน Line

จะขอเสนอการนำ ESP32 ไปใช้งานกับ web dashboard บน server จริง และมี feature ที่สำคัญก็คือ Line messaging API (แจ้งเตือนผ่าน Line)

การใช้งานกับ web dashboard บน server จริงคือการประยุกต์ใช้งานแบบ IoT เต็มตัวครับ ภาพรวมของการใช้งานแบบนี้ก็คือ ESP32 จะรับ data จาก sensor ต่าง ๆ และต่อ GPIO ออกไปเพื่อควบคุมอุปกรณ์ / เครื่องใช้ไฟฟ้าในบ้าน  และในฝั่งปลายทาง PC / Notebook / มือถือของเรา) ก็จะเป็น web dashboard ซึ่งสามารถดูข้อมูลหรือสถานะของ sensor หรือระบบรักษาความปลอดภัยที่บ้านผ่าน web dashboard นอกจากดูก็สามารถกดปุ่มสั่งงานเครื่องใช้ไฟฟ้า/อุปกรณ์ใด ๆ ที่บ้านเราได้ นี่คือการใช้งานในลักษณะ IoT เต็มตัว

สิ่งที่ต้องมี 2 อย่าง
🛑 อย่างแรกคือเว็บไซต์ส่วนตัว
การใช้งาน IoT ได้แบบคล่องตัวมากที่สุดสิ่งที่ต้องมีเลยก็คือเว็บไซต์ส่วนตัวของเรา ซึ่งในปัจจุบันนี้การจะจดทะเบียน Domain name + เช่า web hosting บอกได้เลยว่าราคาต่อปีไม่ถึง 1,000 บาทก็มีครับ ถูกสุดที่ผมเคยเห็นประมาณ 850 บาทก็ได้แล้ว ดังนั้นจึงขอแนะนำอย่างยิ่งสำหรับท่านที่ต้องการเรียนรู้การทำ IoT project หรือจะฝึกฝีมือกับ ESP32 เพื่อใช้งาน IoT เต็มรูปแบบก็ควรสมัครเว็บไซต์ส่วนตัวไว้

อีกประเภทหนึ่งที่นิยมกันมากก็คือ “Cloud IoT” อย่างเช่น ThingsBoard , Adafruit IO , Blynk , Thinger.io , ThingSpeak  มันคือแพลตฟอร์มที่ใช้ได้ฟรีสามารถแสดง dashboard ได้และแทบไม่ต้องใช้ code เลย ลักษณะการสร้าง dashboard + เชื่อมข้อมูลกับ ESP32 ของเราจะเป็นการ “ลากแล้ววาง” แต่ผมคิดว่ามันใช้งานไม่ค่อยยืดหยุ่นสักเท่าไหร่ / ปรับแต่งเองได้ไม่เต็มที่และที่สำคัญก็คือใช้กับ Line messaging API ได้ยาก

🛑 อย่างที่สองคือ Line messaging API
Line messaging API ที่จะใช้งานในโปรเจคอย่างกระทู้นี้ ทุกคนก็สามารถสมัครได้ฟรีโดยใช้งานได้ 300 ข้อความต่อเดือนซึ่งก็ถือว่าเหลือเฟือในการใช้งานเพื่อทดลองและเรียนรู้ครับ …. การใช้ Line messaging API จะต้องสมัคร LINE Official Account ก่อน … เริ่มที่นี่ครับ
https://manager.line.biz/
ดูวิธีการสมัครที่นี่
(คลิปจากช่อง ครูอภิวัฒน์ “สอนสร้างสื่อ”
https://www.youtube.com/@KruApiwat


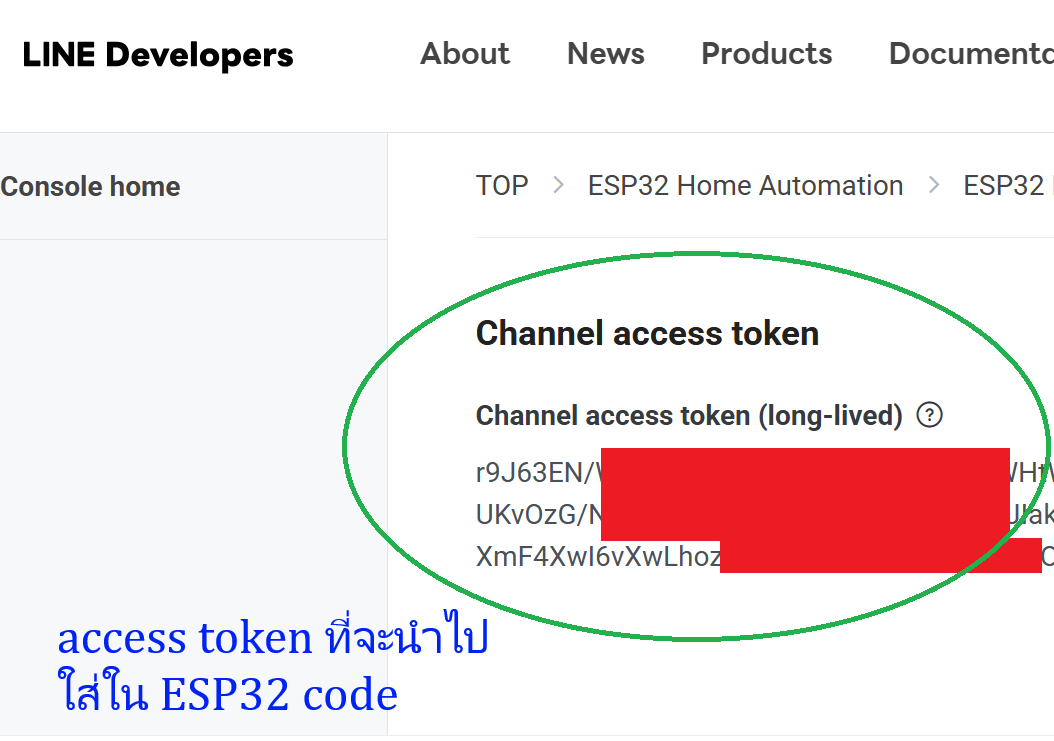
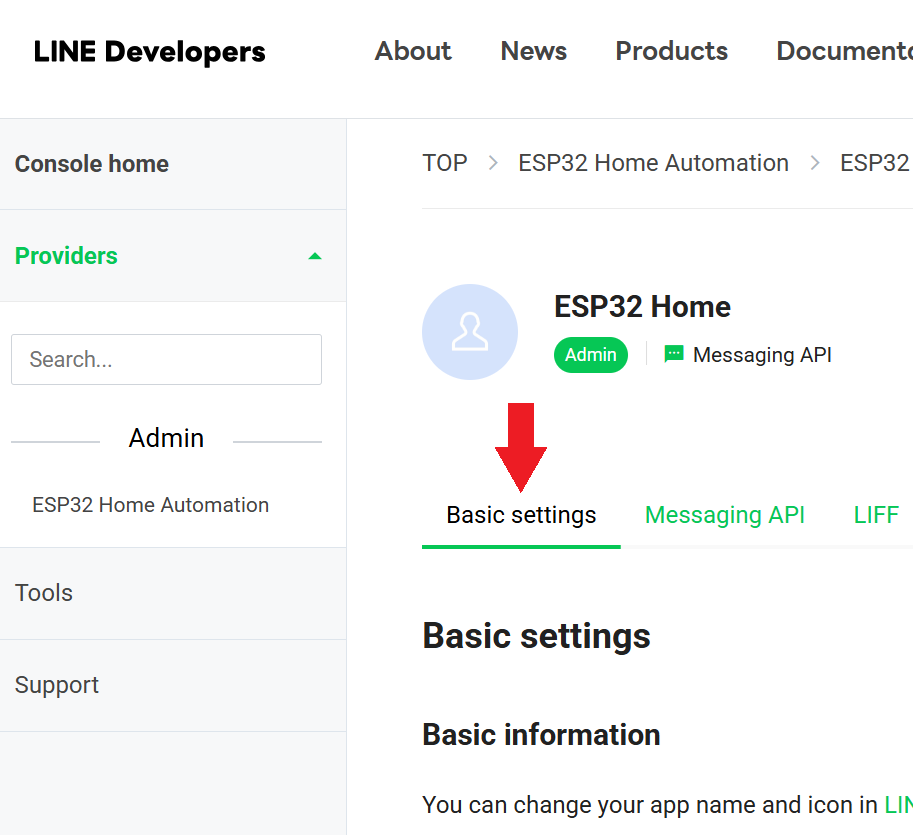
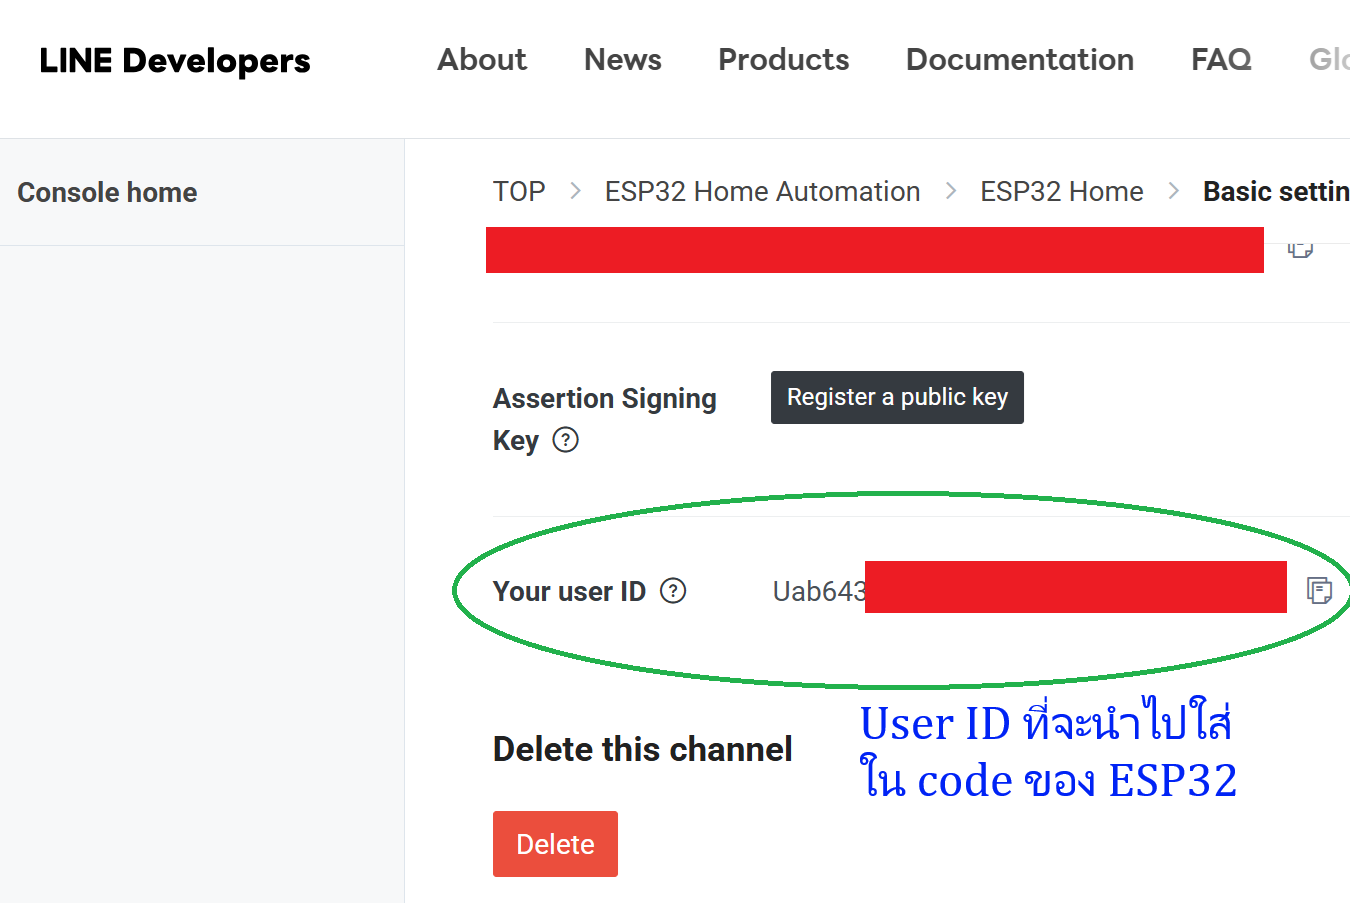
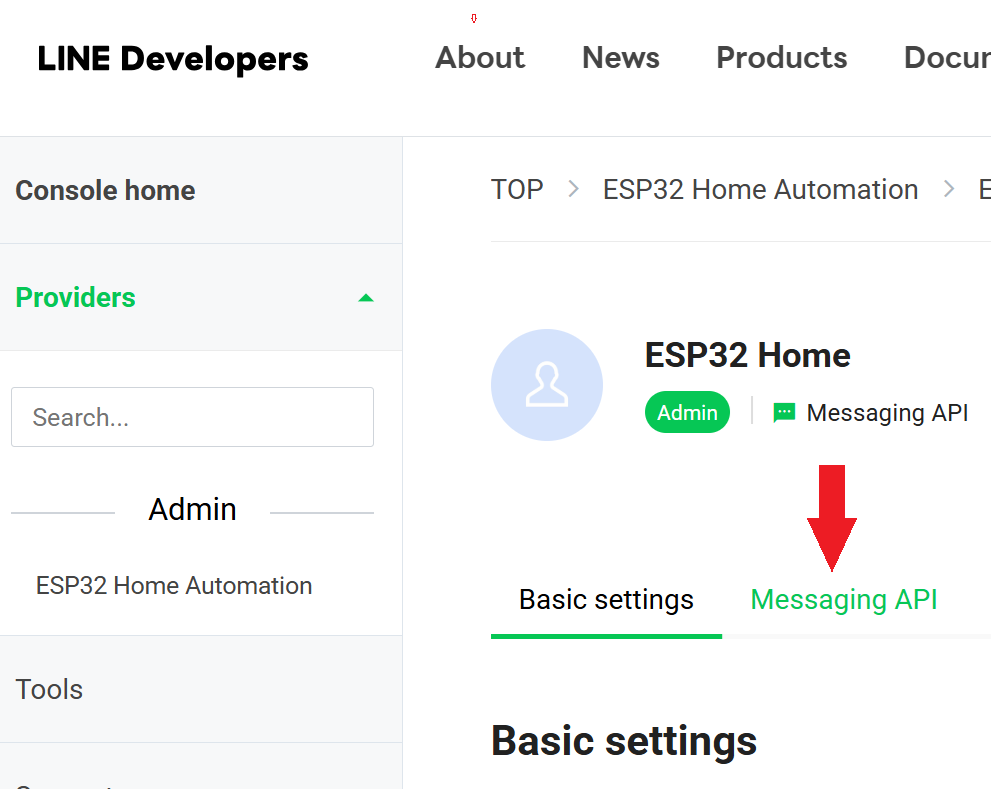
เมื่อสมัคร LINE Official Account เสร็จแล้วก็ไป enable messaging API …. และเมื่อทุกอย่างเรียบร้อยแล้วทั้ง 4 ภาพด้านล่างนี้คือข้อมูล 2 ส่วนที่จะต้องใช้ไปใส่ใน ESP32 code ครับ
ต่อไปคือสถาปัตยกรรมในระบบ IoT ทั่วไป (ซึ่ง project นี้ก็ใช้แบบนี้)
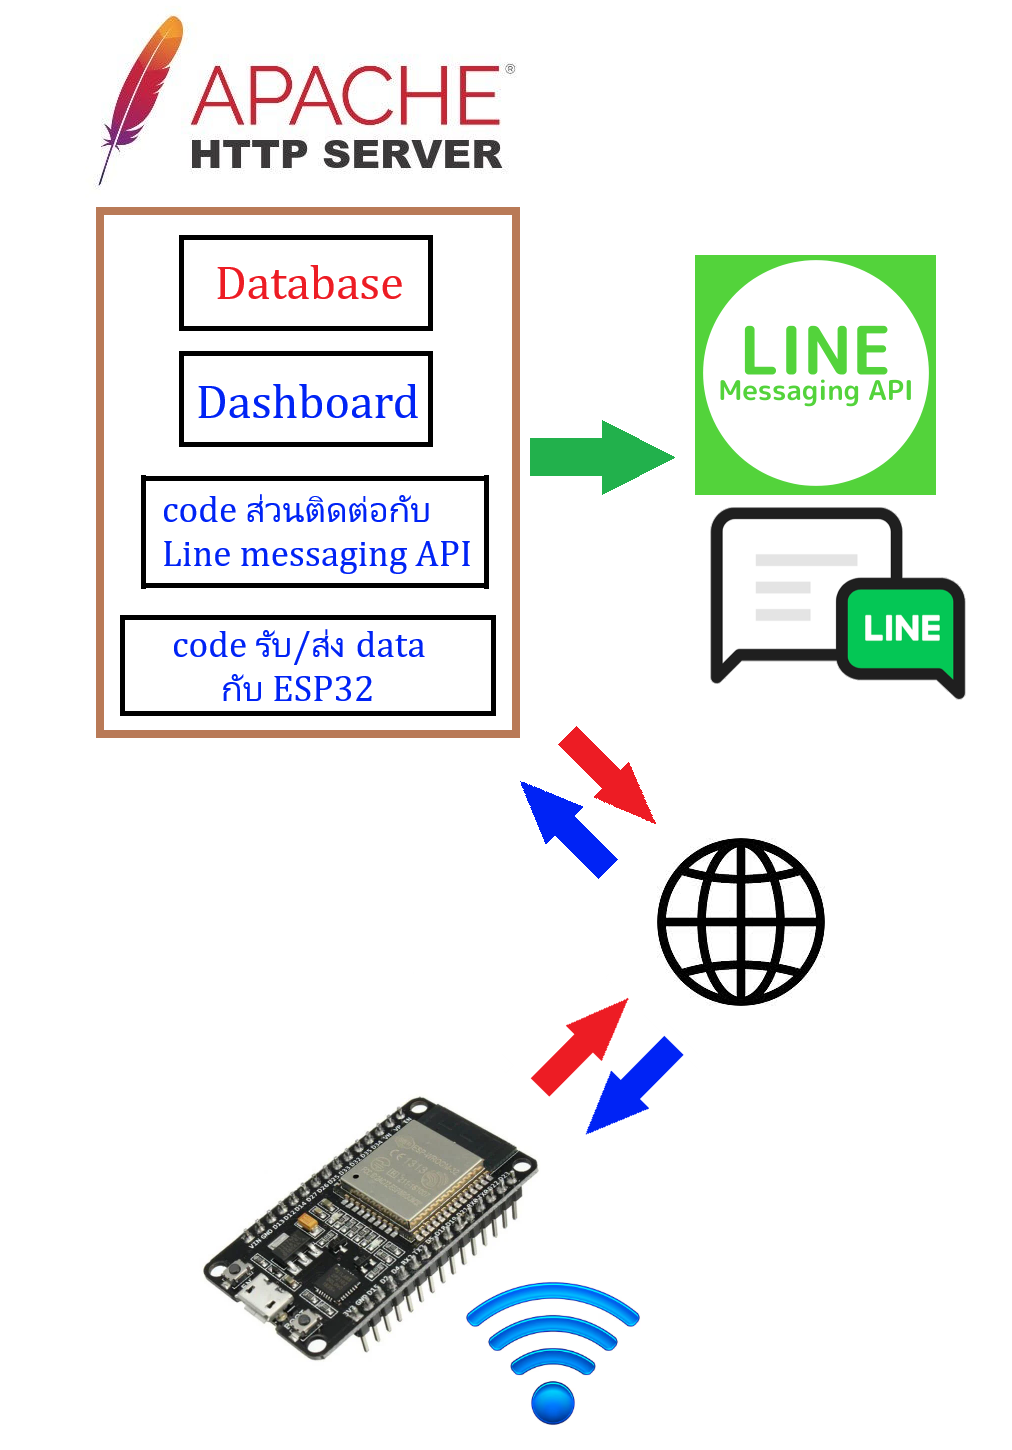
จากภาพบนนี้  ESP32 ที่บ้านหรือที่ทำงานเราก็ทำหน้าที่เป็นเพียง client เพื่อที่จะส่ง-รับข้อมูลเข้าระหว่าง web server  ในส่วนของ web server ก็จะเป็นที่เก็บ dashboard + database ซึ่ง database ไม่ต้องยุ่งยากเป็นแบบ SQL เลยครับ ใช้แบบ text file database (JSON) ก็ใช้งานได้ดีเพียงพอแล้วกับ sensor 2 – 3 ตัวและการเก็บข้อมูลประมาณ 1 สัปดาห์ต่อเนื่องกัน


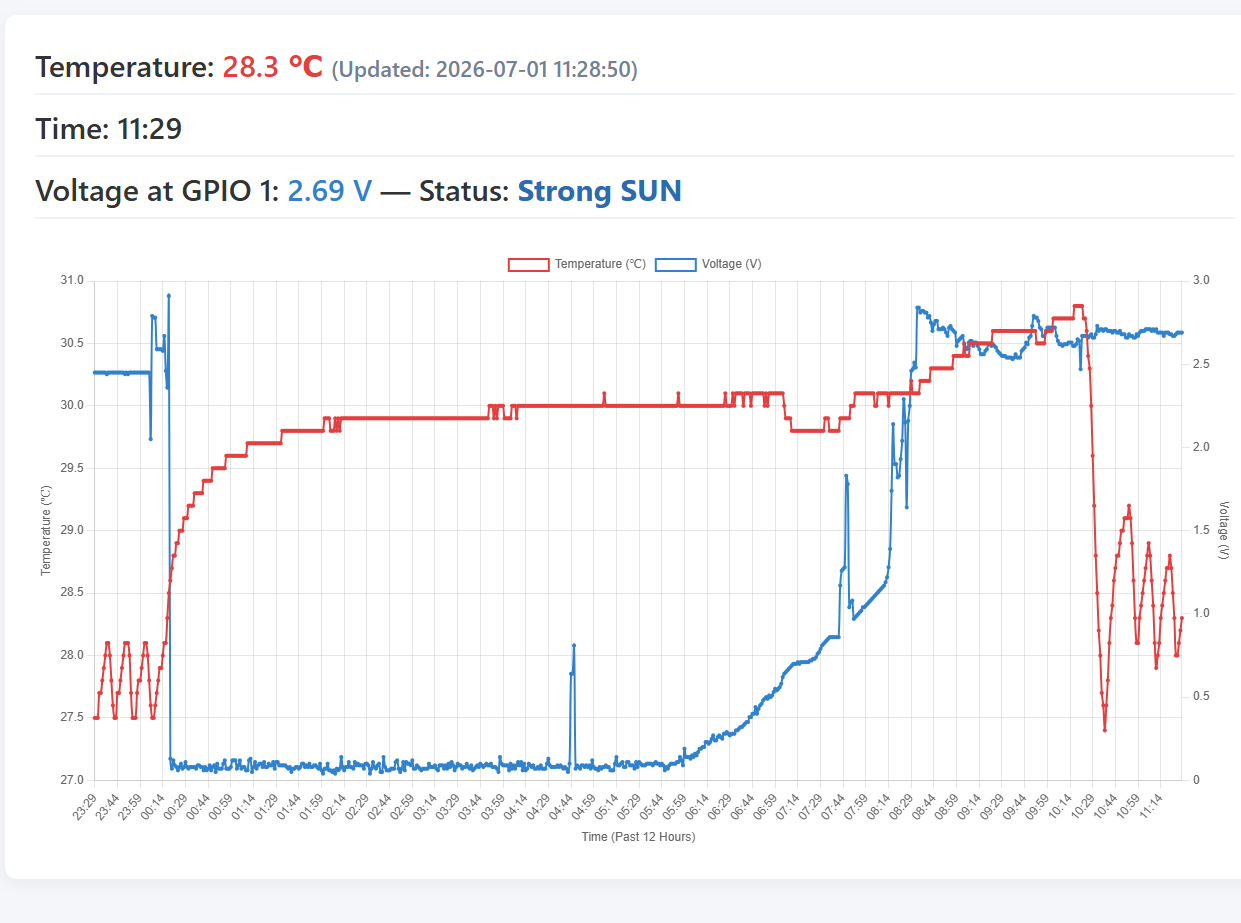
ใน project ที่ผมจะสาธิตให้ดูในกระทู้นี้หน้าตาของ web dashboard ก็คือตามภาพล่างครับ  
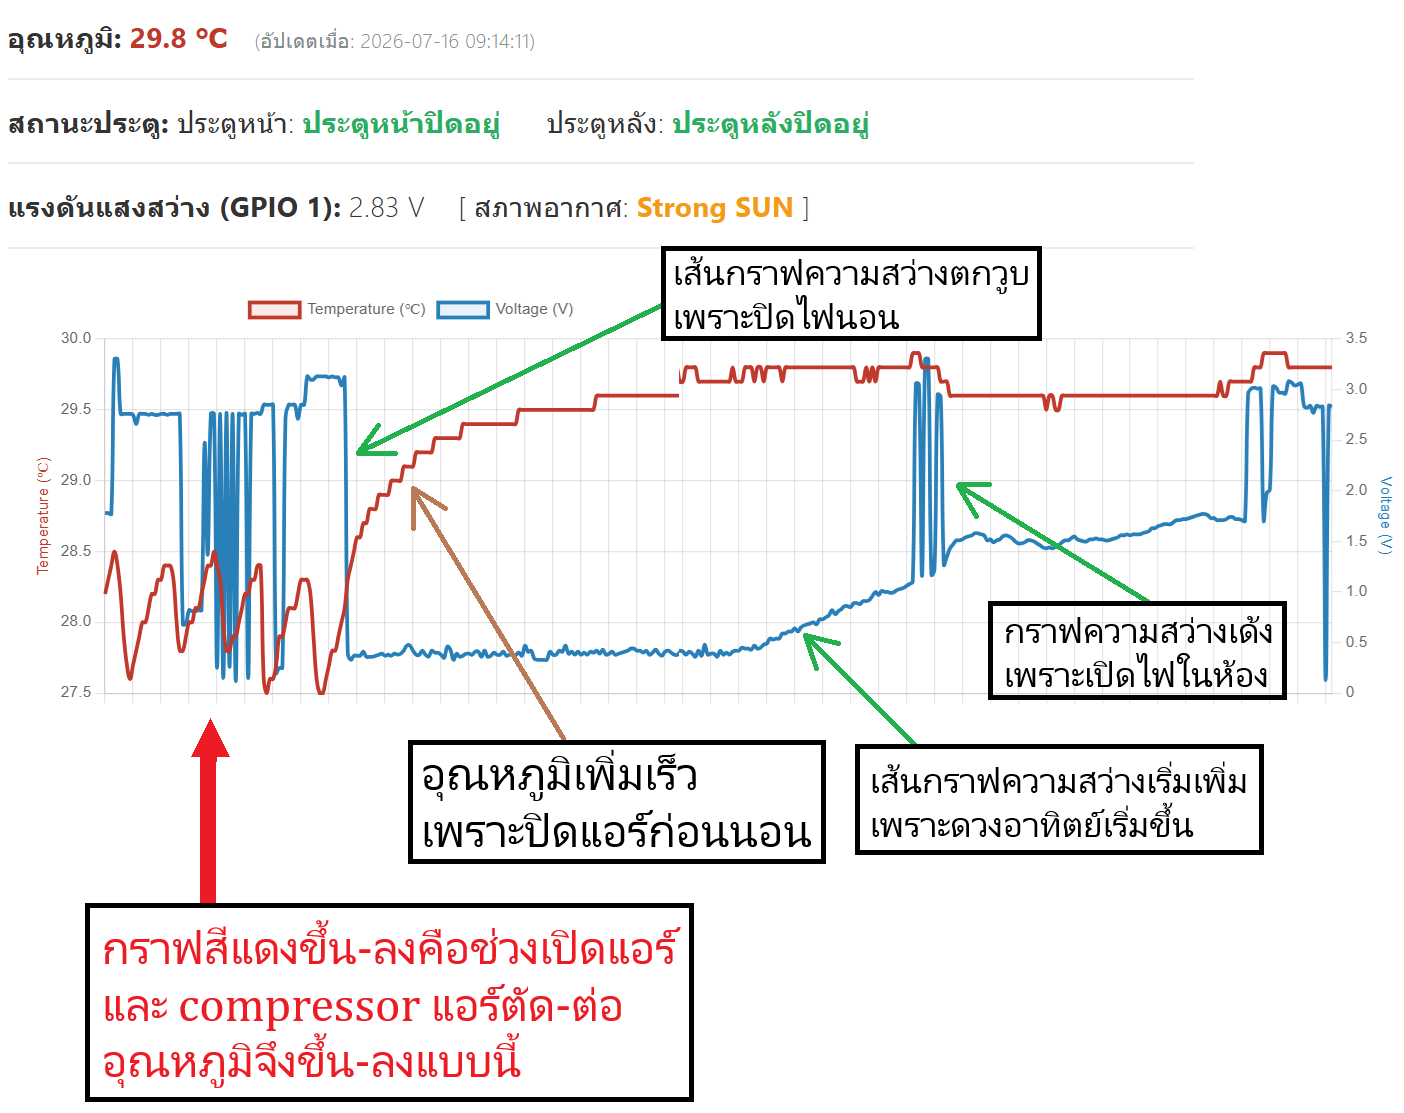
ผมต่อ sensor ไว้ 2 ตัวก็คือ DHT22 กับ LDR เพื่อแสดงค่าอุณหภูมิและความสว่างของแสงแสดงเป็นกราฟทุก 1 นาทีและได้รวมระบบ Line messaging API ไว้ด้วย  โดยใน Code กำหนดให้ส่งข้อความแจ้งเตือนเมื่อมีการเปิดประตูและแสงสว่างมีค่าต่ำกว่าที่กำหนดไว้ครับ

นี่คือภาพของอุปกรณ์ที่ใช้มีเพียงเท่านี้ ก็คือมี sensor 2 ตัวเท่านั้น
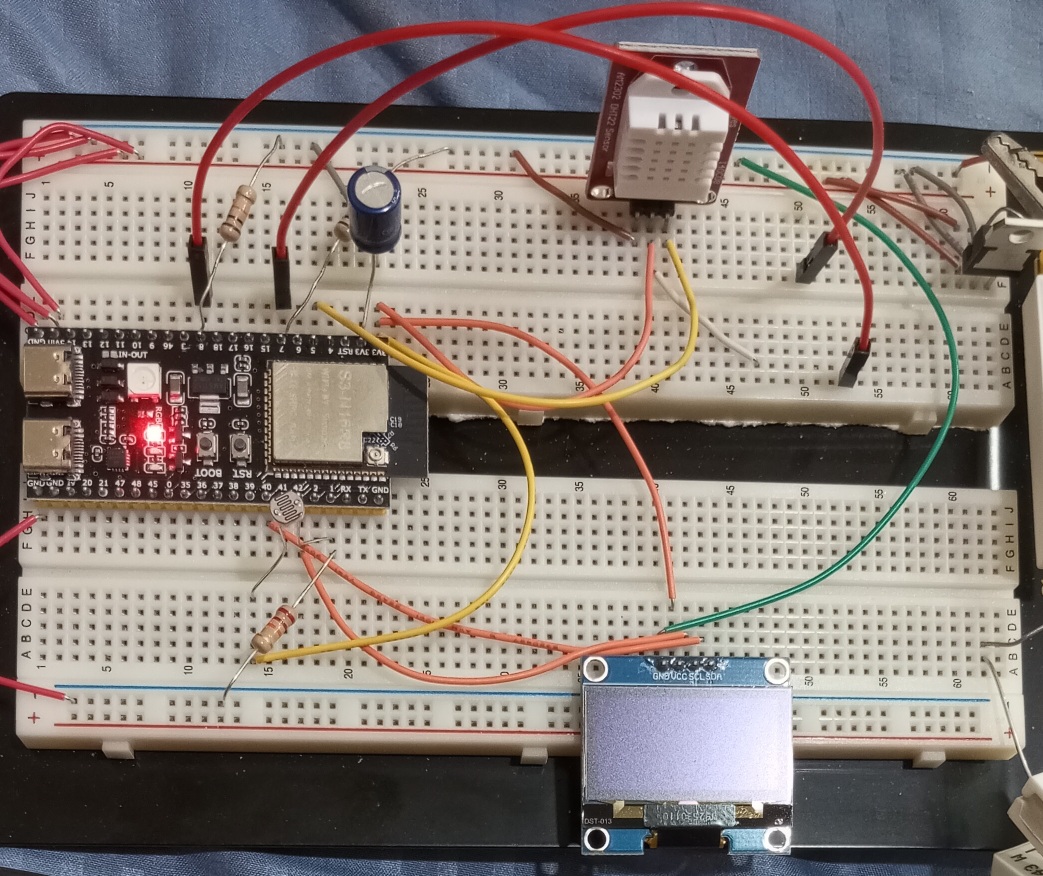
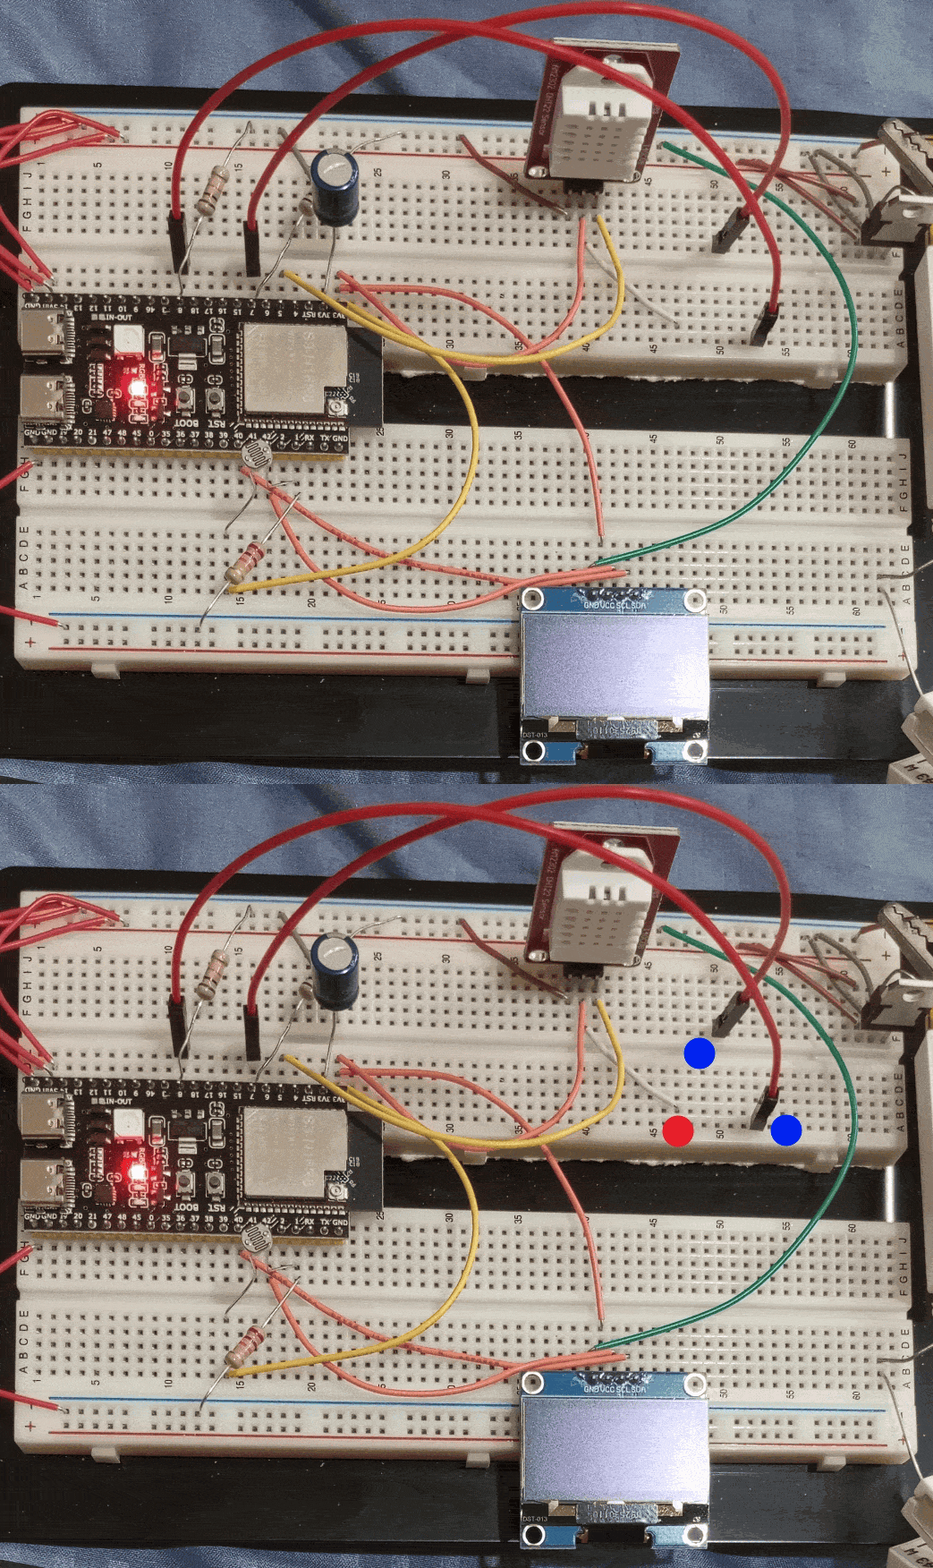
และในภาพนี้สังเกตจุดสีแดงกับน้ำเงินกระพริบอยู่ก็คือเป็นสาย jumper 2 เส้นที่ผมใช้แทน switch จำลองการเปิดประตูด้านหน้าและด้านหลังส่งข้อมูลไปยังเว็บ server เพื่อส่งข้อความเข้า LINE ในมือถือเมื่อประตูถูกเปิดหรือเมื่อความสว่างของแสงน้อยกว่าที่กำหนดครับ

คลิบนี้แสดงถึงการแจ้งเตือนผ่าน Line

Code ทั้งหมด

/*
   ESP32-S3 N16R8 Data Logger & Monitor (Core 3.3.1)
   Hardware Connections:
   - DHT22 Data Pin: GPIO 5 (needs 10k pull-up resistor to 3.3V)
   - LDR/Voltage Sensor: GPIO 1 (Analog input ADC1_CH0)
   - Front Door Sensor: GPIO 7 (Logic input with internal pull-up)
   - Back Door Sensor: GPIO 8 (Logic input with internal pull-up)
*/

#include <WiFi.h>
#include <HTTPClient.h>
#include <WiFiClientSecure.h>
#include <DHT.h>

// Wi-Fi Credentials
const char* ssid     = "NT91124G";
const char* password = "911928TOT";

// API Endpoints & Credentials
const char* serverUrl = "https://www.navy007.com/temp32/data_receiver.php";
const char* lineApiUrl = "https://api.line.me/v2/bot/message/push";
const char* lineToken  = " Line Token ของท่าน "; 
const char* lineUserId = " User ID ของท่าน ";

// Pins
#define DHTPIN 5
#define DHTTYPE DHT22
#define VOLT_PIN 1
#define DOOR_FRONT_PIN 7
#define DOOR_BACK_PIN 8

DHT dht(DHTPIN, DHTTYPE);

// Timers (Non-blocking)
unsigned long lastDHTSend = 0;
unsigned long lastSensorRead = 0;
const unsigned long dhtInterval = 60000;   // 1 minute
const unsigned long sensorInterval = 5000; // 5 seconds

// State tracking for LINE Spam Prevention
enum LightState { DARK, PARTLY_CLOUD, STRONG_SUN };
LightState currentLightState = STRONG_SUN; 
bool isFirstLightRead = true;

int lastFrontDoorState = -1; 
int lastBackDoorState = -1;

// Float definitions for tracking current values
float currentTemperature = 0.0;
float currentHumidity = 0.0;
float currentVoltGPIO1 = 0.0;

void setup() {
  Serial.begin(115200);
  
  // Setup Sensor Pins
  dht.begin();
  pinMode(VOLT_PIN, INPUT); // ADC1_CH0 (GPIO 1 is safe for ADC)
  pinMode(DOOR_FRONT_PIN, INPUT_PULLUP);
  pinMode(DOOR_BACK_PIN, INPUT_PULLUP);
  
  // Setup Wi-Fi
  WiFi.begin(ssid, password);
  Serial.print("Connecting to Wi-Fi");
  while (WiFi.status() != WL_CONNECTED) {
    delay(500);
    Serial.print(".");
  }
  Serial.println("\nConnected to Wi-Fi Network!");
}

void loop() {
  unsigned long currentMillis = millis();

  // Task 1: Pull DHT22 Data every 1 minute
  if (currentMillis - lastDHTSend >= dhtInterval) {
    lastDHTSend = currentMillis;
    readDHT22();
    sendDataToServer();
  }

  // Task 2 & 3: Monitor GPIO 1, 7, and 8 every 5 seconds
  if (currentMillis - lastSensorRead >= sensorInterval) {
    lastSensorRead = currentMillis;
    monitorPins();
  }
}

void readDHT22() {
  float temp = dht.readTemperature();
  float hum = dht.readHumidity();
  if (!isnan(temp) && !isnan(hum)) {
    currentTemperature = temp;
    currentHumidity = hum;
    Serial.printf("DHT22 - Temp: %.2f C, Hum: %.2f%%\n", temp, hum);
  } else {
    Serial.println("Error reading from DHT22");
  }
}

void monitorPins() {
  // --- GPIO 1 Voltage Monitoring ---
  // ESP32-S3 ADC has 12-bit resolution (0-4095) spanning ~3.1V depending on calibration
  int rawADC = analogRead(VOLT_PIN);
  currentVoltGPIO1 = (rawADC / 4095.0) * 3.3; // Estimated voltage scale

  LightState computedState;
  if (currentVoltGPIO1 < 2.0) {
    computedState = DARK;
  } else if (currentVoltGPIO1 >= 2.0 && currentVoltGPIO1 <= 2.35) {
    computedState = PARTLY_CLOUD;
  } else {
    computedState = STRONG_SUN;
  }

  // Handle state change for light sensor to prevent spamming
  if (computedState != currentLightState || isFirstLightRead) {
    currentLightState = computedState;
    isFirstLightRead = false;
    
    if (currentLightState == DARK) {
      sendLineMessage("ระดับแสงต่ำเกินไป");
    }
  }

  // --- GPIO 7 (Front Door) & GPIO 8 (Back Door) Monitoring ---
  int frontDoor = digitalRead(DOOR_FRONT_PIN);
  int backDoor = digitalRead(DOOR_BACK_PIN);

  // Spam prevention check for front door
  if (frontDoor != lastFrontDoorState) {
    lastFrontDoorState = frontDoor;
    if (frontDoor == HIGH) { // Logic 1 = Open
      sendLineMessage("ประตูหน้าเปิด");
    }
  }

  // Spam prevention check for back door
  if (backDoor != lastBackDoorState) {
    lastBackDoorState = backDoor;
    if (backDoor == HIGH) { // Logic 1 = Open
      sendLineMessage("ประตูหลังเปิด");
    }
  }

  Serial.printf("GPIO1: %.2f V, Front: %d, Back: %d\n", currentVoltGPIO1, frontDoor, backDoor);
}

// Function to Send Official LINE Push Notification
void sendLineMessage(String message) {
  if (WiFi.status() != WL_CONNECTED) return;

  WiFiClientSecure client;
  client.setInsecure(); // Required for share hosting or API calls where cert pinning isn't hardcoded
  HTTPClient http;

  http.begin(client, lineApiUrl);
  http.addHeader("Content-Type", "application/json");
  http.addHeader("Authorization", "Bearer " + String(lineToken));

  // Construct official LINE Push Message JSON
  String jsonPayload = "{\"to\":\"" + String(lineUserId) + "\",\"messages\":[{\"type\":\"text\",\"text\":\"" + message + "\"}]}";

  int httpResponseCode = http.POST(jsonPayload);
  if (httpResponseCode > 0) {
    Serial.println("LINE Push Sent successfully: " + String(httpResponseCode));
  } else {
    Serial.println(String("Error sending LINE Push: ") + http.errorToString(httpResponseCode).c_str());
  }
  http.end();
}

// Push latest telemetry to the Apache Share Hosting Server
void sendDataToServer() {
  if (WiFi.status() != WL_CONNECTED) return;

  WiFiClientSecure client;
  client.setInsecure();
  HTTPClient http;

  http.begin(client, serverUrl);
  http.addHeader("Content-Type", "application/x-www-form-urlencoded");

  // Format POST payload
  String postData = "temp=" + String(currentTemperature, 2) +
                    "&volt=" + String(currentVoltGPIO1, 2) +
                    "&front_door=" + String(lastFrontDoorState) +
                    "&back_door=" + String(lastBackDoorState);

  int httpResponseCode = http.POST(postData);
  if (httpResponseCode > 0) {
    Serial.println("Telemetry synced: " + String(httpResponseCode));
  } else {
    Serial.println(String("Error syncing telemetry: ") + http.errorToString(httpResponseCode).c_str());
  }
  http.end();
}
ESP32 (EP.2) ESP32 กับ web dashboard

กระทู้ ESP32  EP.2 วันนี้จะขอเสนอเนื้อหาการใช้งาน ESP32 กับ web dashboard ครับ …. ด้วยปัจจุบันเป็นยุคของ IoT ดังนั้นงาน IoT จะต้องทำงานกับ web dashboard เท่านั้น  ซึ่ง ESP32 + web dashboard ก็เป็นไปได้ 2 แบบครับคือแบบ local กับแบบอยู่บนอินเทอร์เน็ตใน server จริง

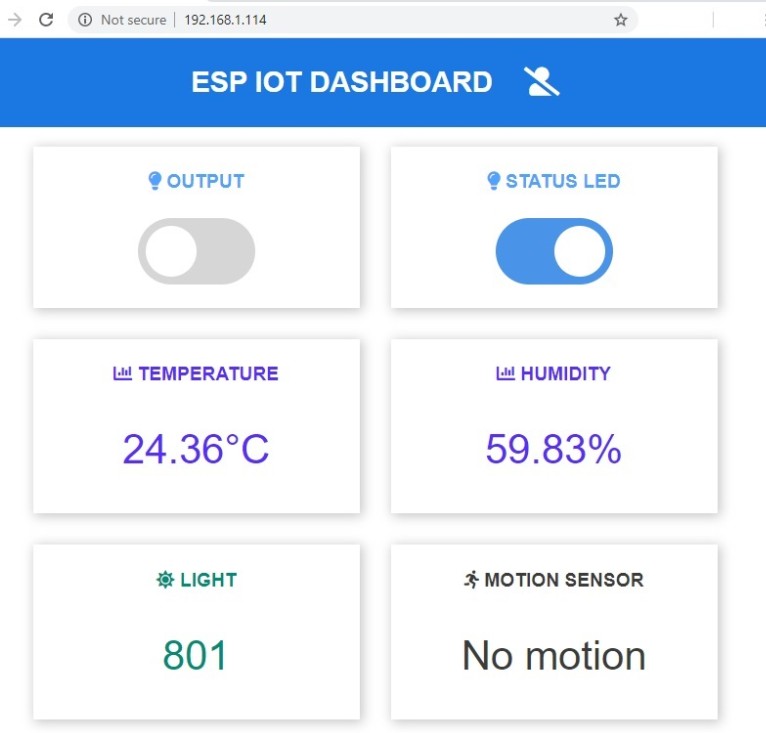
ตัวอย่างหน้าตาของ dashboard


ในกระทู้นี้จะเป็นรายละเอียดของการที่จะให้ ESP32 ทำการ host dashboard เอาไว้ทั้งดุ้นและให้ PC หรือมือถือเข้าถึง dashboard เพื่อดูข้อมูล sensor หรือควบคุม GPIO ของ ESP32 ครับ

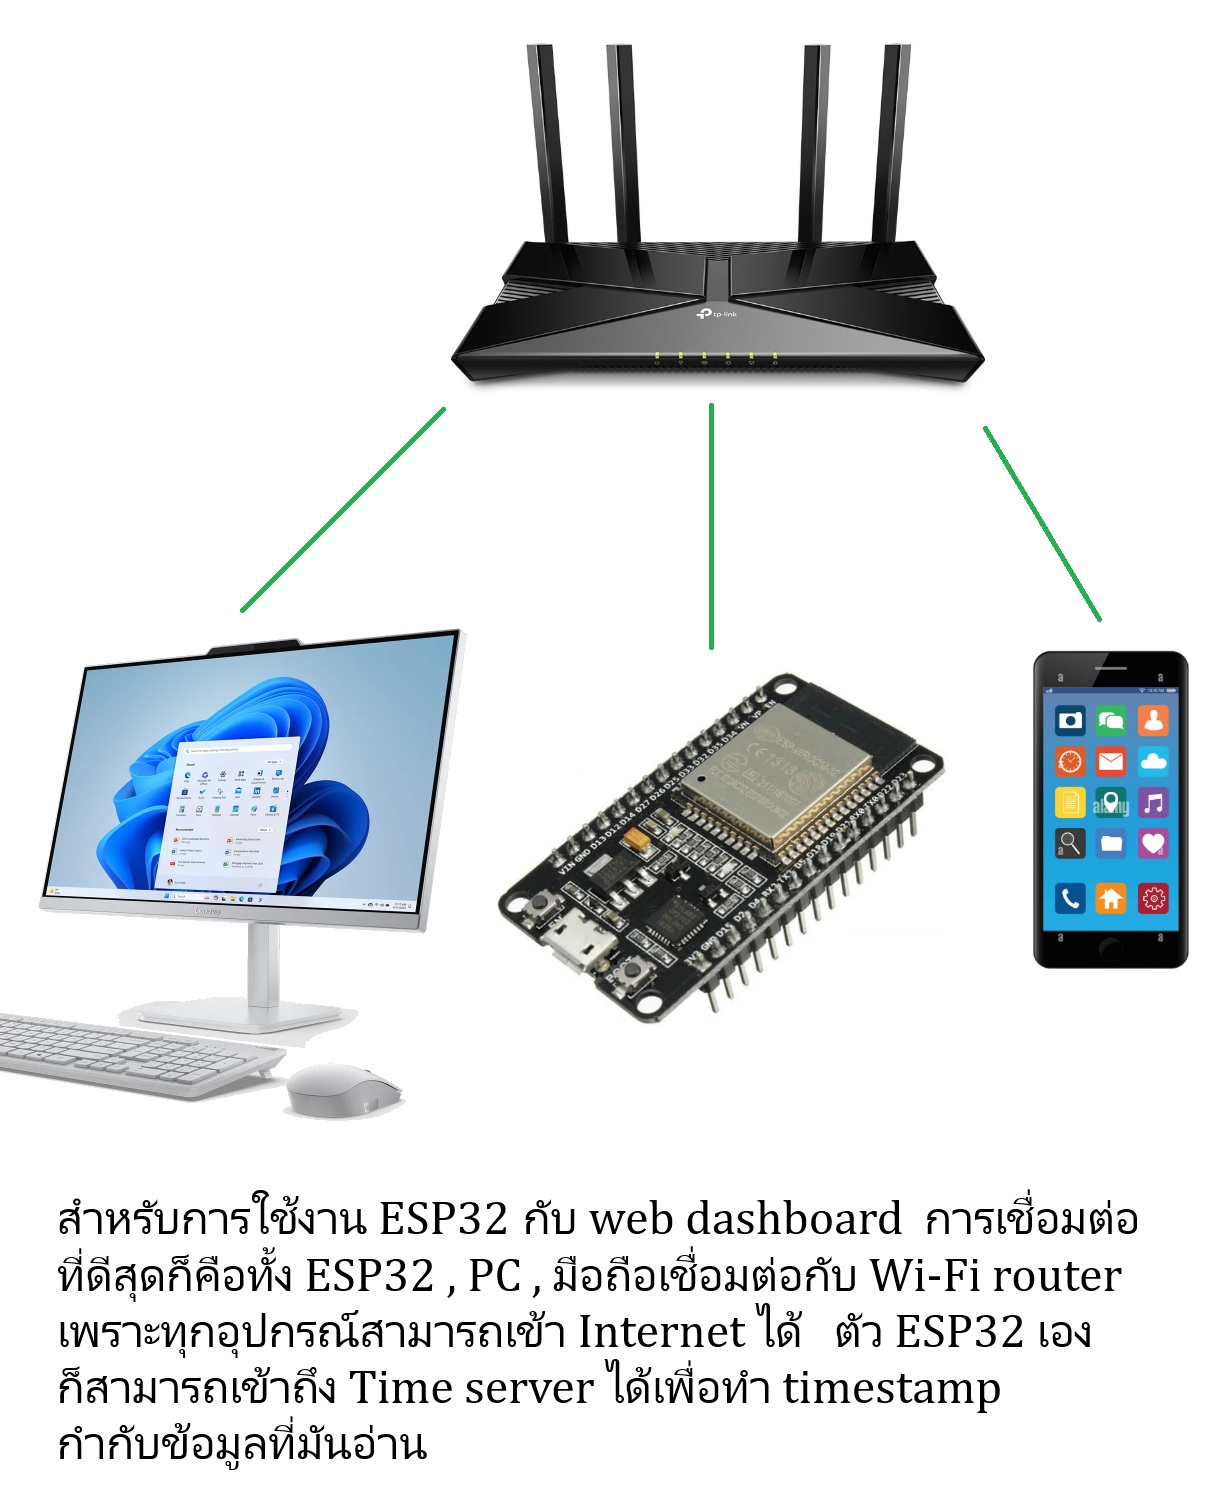
การเชื่อมต่อระหว่าง ESP32 กับ PC/Notebook และมือถือสามารถทำได้หลายแบบ  การเชื่อมต่อที่ดีที่สุดก็คือหากที่บ้านของท่านมี Wi-Fi router ก็เชื่อมต่อแบบในภาพด้านล่างนี้ครับ

แต่หากที่บ้านไม่มี Wi-Fi router หรือออกนอกบ้าน/ไปทดลองที่อื่น ก็ใช้เพียงแค่มือถือกับ ESP32 แค่ 2 อย่างเท่านั้น และใช้มือถือปล่อย Wi-Fi hotspot รายละเอียดตามภาพล่าง


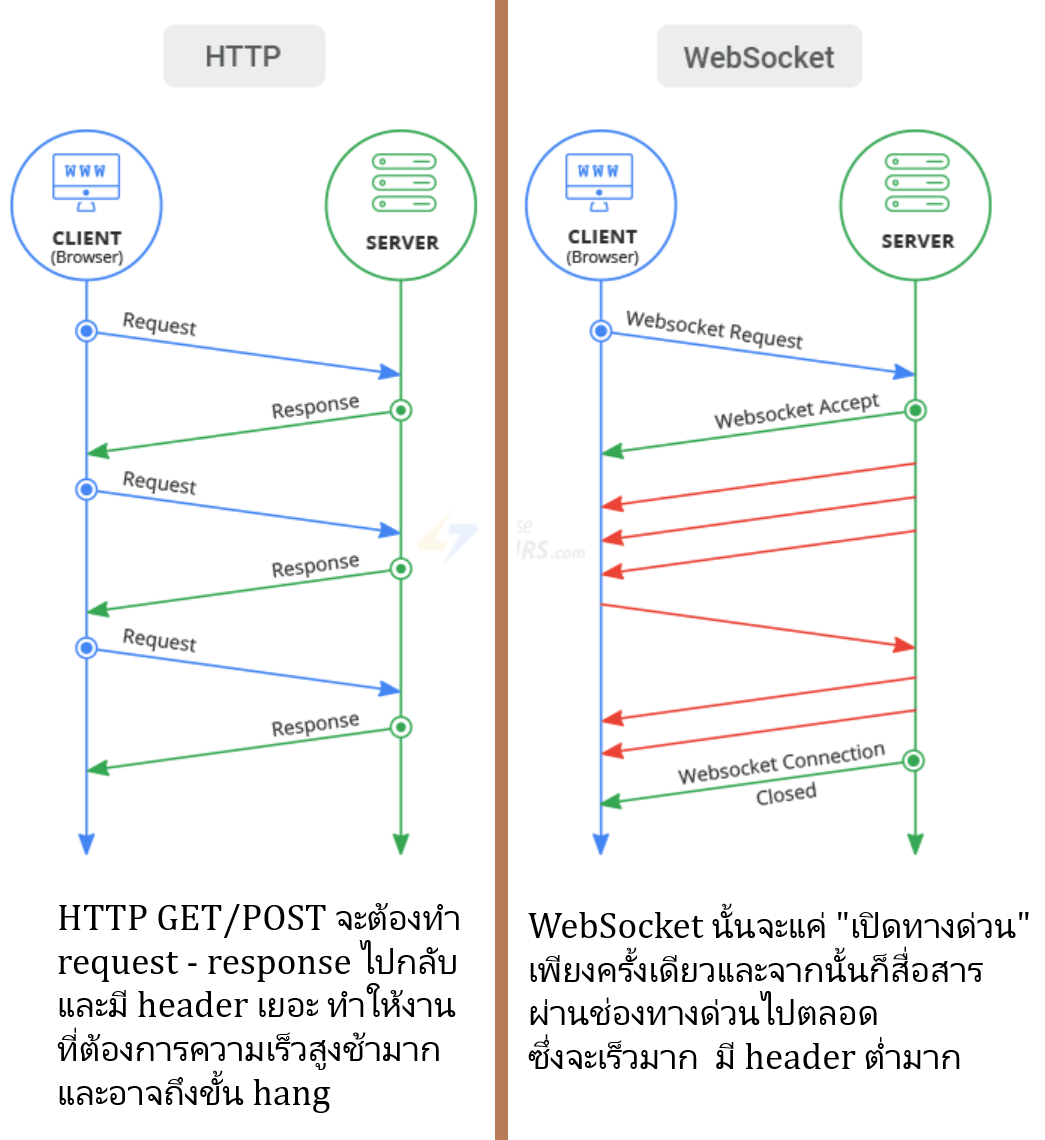
การสื่อสารระหว่าง ESP32 กับ web dashboard นั้นผมขอกล่าวถึงพื้นฐาน “Protocol” ก่อน  คำว่า protocol หมายถึง “วิธีการ” ที่ dashboard สื่อสารกับ ESP32  ซึ่งในโลกอินเตอร์เนตในเวบต่าง ๆ นั้นจะใช้วิธีการ HTTP GET/POST ซึ่งวิธีนี้เป็นการรับ/ส่งข้อมูลเป็นรายครั้ง เช่นส่ง/รับครั้งเดียว , วินาทีละ 1 ครั้งหรือส่งข้อมูลหลายครั้งใน 1 วินาที  ซึ่งถ้าต้องการความรวดเร็วมากกว่านี้อาจจะมีปัญหาได้เพราะ HTTP GET/POST จะมี header เยอะ (อาจมากถึง 2 – 3 KB) ซึ่งการรับส่งข้อมูลเพียง 10 – 20 bytes เทียบกับขนาด header 2,000 – 3,000 bytes …. นี่แหละที่ทำให้วิธี HTTP GET/POST เกิดปัญหาหากต้องการส่งข้อมูลหลายครั้งใน 1 วินาที

ดังนั้น  ทางออกการใช้ ESP32 + dashboard ที่ตอบสนองรวดเร็วคือการใช้ Asynchronous web server + websocket ครับ  เพราะ websocket จะเปรียบเสมือน “ทางด่วน” ที่จะเปิดช่องรับส่งข้อมูลระหว่าง ESP32 กับ web dsahboard และการรับส่งข้อมูลด้วย protocol แบบนี้จะมี header น้อยมากเพียง 4 – 8 byte ทำให้รับส่งข้อมูลด้วยความเร็วสูงได้ดีครับ


ส่วน Asynchronous web server ….
ขอกล่าวย้อนไปถึงการทำงานของ web server ทั่วไปก่อน ก็คือ web server ทั่วไปแบบ synchronous ก็คือจะต้องทำงานได้งานเดียวในแต่ละครั้ง ส่วนงานอื่น ๆ จะต้อง “รอ”ก่อน  ซึ่งจะทำให้เกิดปัญหาสำคัญก็คือใน web dashboard จะต้องมีการแสดงข้อมูลต่าง ๆ เป็น real time  และถ้าเรากดปุ่มใดใน dashboard เพื่อควบคุม GPIO อาจจะเกิดปัญหาการสะดุดหรือล่าช้าในการควบคุมได้

ดังนั้นในปัจจุบันนี้มาตรฐานการ Code สำหรับ ESP32 จะใช้ Asynchronous Web Server +websocket เท่านั้น ซึ่งสามารถแก้ปัญหาการ “รอ” ได้ทั้งหมดเพราะมันจะใช้ความสามารถของ dual core CPU ของ ESP32 ทำ 2 งานได้พร้อมกัน นั่นก็หมายความว่าแม้ dashboard ของเราจะมีการรับข้อมูลหรือกดปุ่มสั่งงาน GPIO ที่ยุ่งยากซับซ้อนและรวดเร็วแค่ไหน ทุกงานที่เราทำก็จะเป็นอิสระแก่กันหมดไม่มีการรออีกต่อไป


สำหรับ project นี้ที่จะสาธิตให้ดูก็เช่นเคยแบบกระทู้ที่แล้วครับ ก็คือจะใช้ AI เขียน code ให้ทั้งหมดเพียงแค่เราเขียน prompt ให้ถูกต้องและบอก AI ให้ละเอียดว่าให้ใช้วิธี asynchronous web server + websocket ในการ code …. AI ก็จะเขียน code ด้วยวิธีนี้ให้เรา  ในการใช้งานกับจะต้องใช้ library สำหรับ asynchronous web server websocket ด้วย

ในคลิปนี้สังเกตที่หน้า dashboard จะมีปุ่มควบคุม LED อยู่ 5 ปุ่มก็คือปิด/เปิด LED 4 ดวงและปุ่มสุดท้ายคือทำให้ LED ทั้ง 4 ดวงวิ่งเป็นไฟวิ่งครับ  ในส่วนที่ 2 จะมี slider สามารถปรับความถี่ของไฟวิ่ง และส่วนที่ 3 จะเป็นการแสดงค่าความสว่างซึ่งผมใช้ LDR กับตัวความต้านทานมาทำเป็น voltage divider เพื่อให้ได้แรงดันไฟที่เหมาะสมที่จะป้อนเข้า GPIO 1  ซึ่งตัว LDR ผมก็วัดค่าความต้านทานจริงของมันตามสภาพแสงในห้อง เพื่อจะได้คำนวณให้ได้แรงดันที่เหมาะสมและใน code ก็สั่งให้ map ค่าแรงดันช่วง 1.9 ถึง 3 โวลต์ที่ GPIO 1 นี้ให้เป็นค่าความสว่าง 0 ถึง 100% ครับ

Code ของ project นี้

#include <WiFi.h>
#include <ESPAsyncWebServer.h>
#include <AsyncTCP.h>

// WiFi Credentials
const char* ssid = "NT91124G";
const char* password = "911928TOT";

// Pin Configurations
const int ledPins[4] = {5, 7, 8, 10};
const int ldrPin = 1;

// State Variables
bool ledStates[4] = {false, false, false, false};
bool runningMode = false;
int runningFreq = 5; // Default 5 Hz
unsigned long lastLdrReadTime = 0;
unsigned long lastLedStepTime = 0;
int currentRunningStep = 0;

// Web Server and WebSocket instances on port 80
AsyncWebServer server(80);
AsyncWebSocket ws("/ws");

// HTML/JS Dashboard Source
const char index_html[] PROGMEM = R"rawliteral(
<!DOCTYPE html>
<html>
<head>
    <title>ESP32-S3 GPIO Dashboard</title>
    <meta name="viewport" content="width=device-width, initial-scale=1">
    <style>
        body { font-family: Arial, sans-serif; text-align: center; margin:0; padding: 20px; background: #f4f6f9; color: #333; }
        h1 { color: #2c3e50; margin-bottom: 25px; }
        .container { max-width: 500px; margin: 0 auto; background: white; padding: 20px; border-radius: 12px; box-shadow: 0 4px 10px rgba(0,0,0,0.1); }
        h2 { font-size: 1.2rem; border-bottom: 2px solid #eee; padding-bottom: 8px; margin-top: 25px; text-align: left; color: #34495e; }
        .grid { display: grid; grid-template-columns: repeat(2, 1fr); gap: 12px; margin-bottom: 15px; }
        button { padding: 14px; font-size: 1rem; font-weight: bold; border: none; border-radius: 8px; cursor: pointer; transition: 0.2s; background: #e0e0e0; color: #555; }
        button.active { background: #2ecc71; color: white; }
        button#btn-run { grid-column: span 2; background: #3498db; color: white; }
        button#btn-run.active { background: #e74c3c; }
        .slider-wrapper { margin: 20px 0; text-align: left; }
        .slider-label { display: flex; justify-content: space-between; font-weight: bold; margin-bottom: 5px; }
        input[type=range] { width: 100%; height: 8px; border-radius: 5px; background: #ddd; outline: none; -webkit-appearance: none; }
        input[type=range]::-webkit-slider-thumb { -webkit-appearance: none; width: 20px; height: 20px; border-radius: 50%; background: #3498db; cursor: pointer; }
        .bar-container { background: #eee; border-radius: 8px; height: 25px; width: 100%; overflow: hidden; position: relative; margin-top: 10px; }
        .bar { background: #f1c40f; height: 100%; width: 0%; transition: width 0.1s ease; }
        .bar-text { position: absolute; width: 100%; text-align: center; top: 3px; font-weight: bold; font-size: 0.9rem; color: #222; }
    </style>
</head>
<body>
    <div class="container">
        <h1>ESP32-S3 Dashboard</h1>
        
        <h2>Part 1: LED Controls</h2>
        <div class="grid">
            <button id="btn-0" onclick="toggleLed(0)">LED 1</button>
            <button id="btn-1" onclick="toggleLed(1)">LED 2</button>
            <button id="btn-2" onclick="toggleLed(2)">LED 3</button>
            <button id="btn-3" onclick="toggleLed(3)">LED 4</button>
            <button id="btn-run" onclick="toggleRunning()">LED running</button>
        </div>

        <h2>Part 2: Configuration & Sensors</h2>
        <div class="slider-wrapper">
            <div class="slider-label">
                <span>Running Frequency</span>
                <span id="freq-val">5 Hz</span>
            </div>
            <input type="range" id="freq-slider" min="1" max="20" step="1" value="5" oninput="updateFreq(this.value)">
        </div>

        <div style="text-align: left; font-weight: bold; margin-top: 15px;">Light Level</div>
        <div class="bar-container">
            <div id="ldr-bar" class="bar"></div>
            <div id="ldr-text" class="bar-text">0%</div>
        </div>
    </div>

    <script>
        let gateway = `ws://${window.location.hostname}/ws`;
        let websocket;
        
        window.addEventListener('load', initWebSocket);

        function initWebSocket() {
            console.log('Connecting to WebSocket...');
            websocket = new WebSocket(gateway);
            websocket.onmessage = onMessage;
            websocket.onclose = () => setTimeout(initWebSocket, 2000);
        }

        function onMessage(event) {
            let data = JSON.parse(event.data);
            
            // Sync LED States
            for(let i=0; i<4; i++) {
                let btn = document.getElementById(`btn-${i}`);
                if(data.leds[i]) {
                    btn.classList.add('active');
                } else {
                    btn.classList.remove('active');
                }
            }
            
            // Sync Running Button
            let runBtn = document.getElementById('btn-run');
            if(data.running) {
                runBtn.classList.add('active');
                runBtn.innerText = "Running: ON";
            } else {
                runBtn.classList.remove('active');
                runBtn.innerText = "LED running";
            }

            // Sync Slider Frequency
            document.getElementById('freq-slider').value = data.freq;
            document.getElementById('freq-val').innerText = data.freq + " Hz";

            // Sync LDR Horizontal Bar
            document.getElementById('ldr-bar').style.width = data.ldr + "%";
            document.getElementById('ldr-text').innerText = data.ldr + "%";
        }

        function toggleLed(index) {
            websocket.send(JSON.stringify({action: "toggle_led", value: index}));
        }

        function toggleRunning() {
            websocket.send(JSON.stringify({action: "toggle_running"}));
        }

        function updateFreq(val) {
            document.getElementById('freq-val').innerText = val + " Hz";
            websocket.send(JSON.stringify({action: "set_freq", value: parseInt(val)}));
        }
    </script>
</body>
</html>
)rawliteral";

// Send unified system status package via JSON string
void broadcastStatus() {
    // Map GPIO 1 Voltage reading (1V to 3V target map to 0-100%)
    // ADC on ESP32 S3 yields 0-4095 over ~3.3V attenuation configuration default
    uint32_t analogRaw = analogRead(ldrPin);
    float voltage = (analogRaw / 4095.0) * 3.38;
    
    int lightPercent = map(constrain(voltage * 100, 100, 300), 100, 300, 0, 100);

    String json = "{";
    json += "\"leds\":[" + String(ledStates[0]) + "," + String(ledStates[1]) + "," + String(ledStates[2]) + "," + String(ledStates[3]) + "],";
    json += "\"running\":" + String(runningMode ? "true" : "false") + ",";
    json += "\"freq\":" + String(runningFreq) + ",";
    json += "\"ldr\":" + String(lightPercent);
    json += "}";
    
    ws.textAll(json);
}

// WebSocket Event Handler
void onWsEvent(AsyncWebSocket *server, AsyncWebSocketClient *client, AwsEventType type, void *arg, uint8_t *data, size_t len) {
    if (type == WS_EVT_DATA) {
        data[len] = '\0';
        String msg = (char*)data;
        
        // Very lightweight parsing to prevent JSON library dependency crashes
        if (msg.indexOf("toggle_led") > 0) {
            int idxIdx = msg.indexOf("\"value\":") + 8;
            int ledIdx = msg.substring(idxIdx, idxIdx + 1).toInt();
            if(!runningMode && ledIdx >= 0 && ledIdx < 4) {
                ledStates[ledIdx] = !ledStates[ledIdx];
                digitalWrite(ledPins[ledIdx], ledStates[ledIdx]);
            }
        } 
        else if (msg.indexOf("toggle_running") > 0) {
            runningMode = !runningMode;
            if(!runningMode) {
                // Revert control straight back to explicit button states
                for(int i=0; i<4; i++) {
                    digitalWrite(ledPins[i], ledStates[i]);
                }
            }
        } 
        else if (msg.indexOf("set_freq") > 0) {
            int valIdx = msg.indexOf("\"value\":") + 8;
            runningFreq = msg.substring(valIdx, msg.indexOf("}")).toInt();
            runningFreq = constrain(runningFreq, 1, 20);
        }
        broadcastStatus();
    }
}

void setup() {
    Serial.begin(115200);

    // Setup Pins
    for(int i=0; i<4; i++) {
        pinMode(ledPins[i], OUTPUT);
        digitalWrite(ledPins[i], LOW);
    }
    pinMode(ldrPin, INPUT);
    analogSetAttenuation(ADC_11db); // Ensures parsing capabilities up to ~3.1-3.3V range

    // Connect to WiFi
    WiFi.begin(ssid, password);
    Serial.print("Connecting to WiFi");
    while (WiFi.status() != WL_CONNECTED) {
        delay(500);
        Serial.print(".");
    }
    Serial.println("");
    Serial.print("Connected! IP Address: ");
    Serial.println(WiFi.localIP());

    // WebSocket Configuration
    ws.onEvent(onWsEvent);
    server.addHandler(&ws);

    // Base Dashboard Rule Route
    server.on("/", HTTP_GET, [](AsyncWebServerRequest *request){
        request->send_P(200, "text/html", index_html);
    });

    server.begin();
}

void loop() {
    ws.cleanupClients();
    unsigned long currentMillis = millis();

    // 1. Periodic 300 ms LDR sampling and status sync
    if (currentMillis - lastLdrReadTime >= 300) {
        lastLdrReadTime = currentMillis;
        broadcastStatus();
    }

    // 2. LED Running Sequencer Logic
    if (runningMode) {
        unsigned long stepInterval = 1000 / runningFreq;
        if (currentMillis - lastLedStepTime >= stepInterval) {
            lastLedStepTime = currentMillis;

            // Turn off all pins for step cycle sequence preparation
            for (int i = 0; i < 4; i++) {
                digitalWrite(ledPins[i], LOW);
            }
            // Sequentially trigger single target active frame
            digitalWrite(ledPins[currentRunningStep], HIGH);

            currentRunningStep = (currentRunningStep + 1) % 4;
        }
    }
}


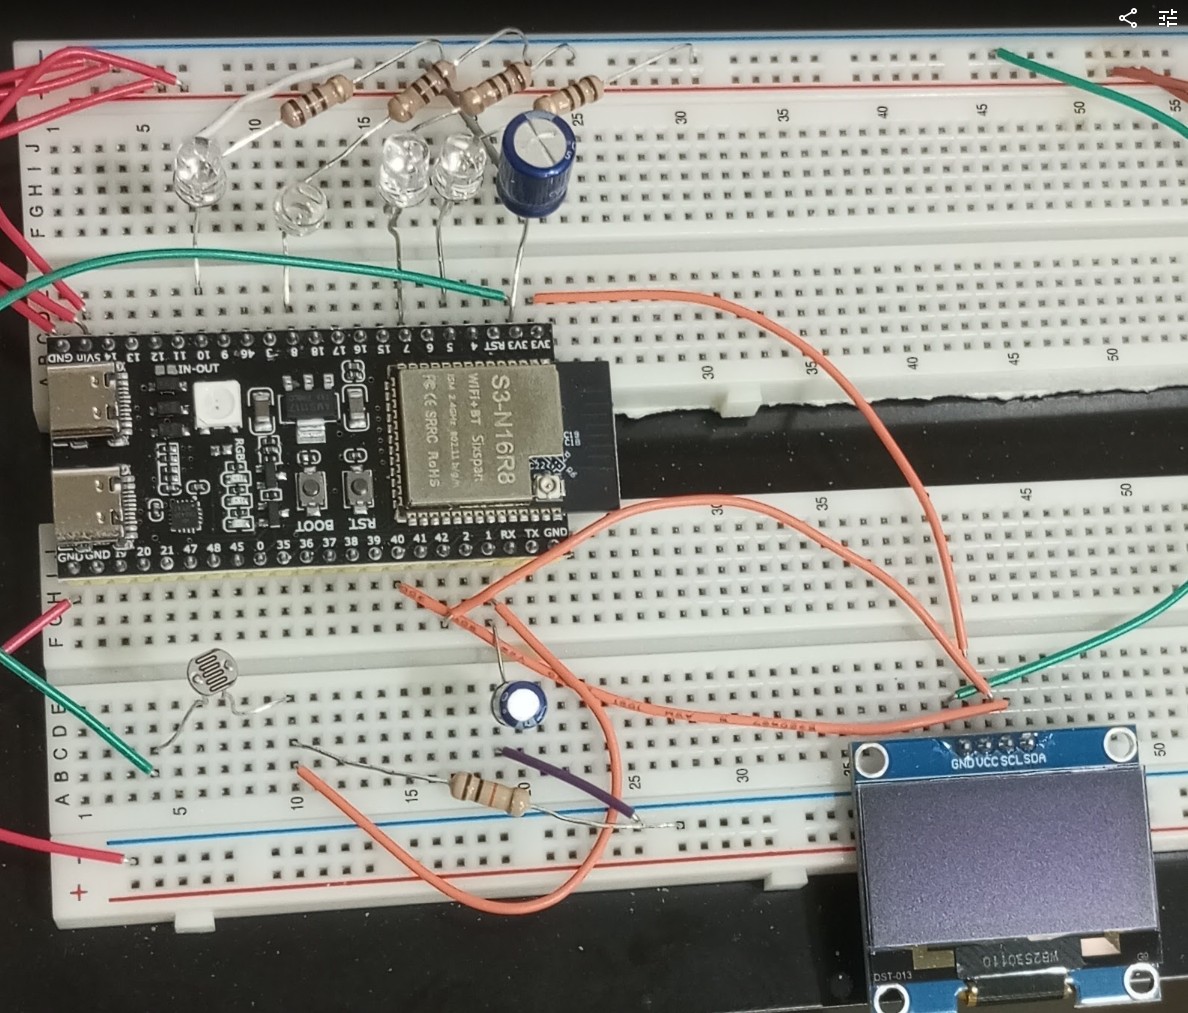
ใช้อุปกรณ์เพียงเท่านี้

กระทู้นี้ขอจบเพียงเท่านี้ก่อน ส่วนกระทู้หน้า EP.3 จะว่าด้วยเรื่องของ Sensor พื้นฐาน + การทำงานกับ ESP32 ครับ

 กระทู้นี้เป็นการเชื่อมต่อระหว่าง ESP32 กับ dashboard แบบ local  ก็คือเชื่อมภายในวง Wi-Fi เดียวกันในบ้าน …. ในกระทู้ต่อไป (EP.4) จะสาธิตการใช้งาน dashboard ที่อยู่บนอินเตอร์เน็ตจริง ๆ ครับ (Apache web server)  ก็คือเป็นลักษณะของการแสดง dashboard ในมือถือเพื่อให้เราดูข้อมูลต่าง ๆ ในบ้านและกดสั่งงานอุปกรณ์ไฟฟ้าที่บ้านผ่านมือถือได้ไม่ว่าเราจะอยู่ที่ไหนบนโลก