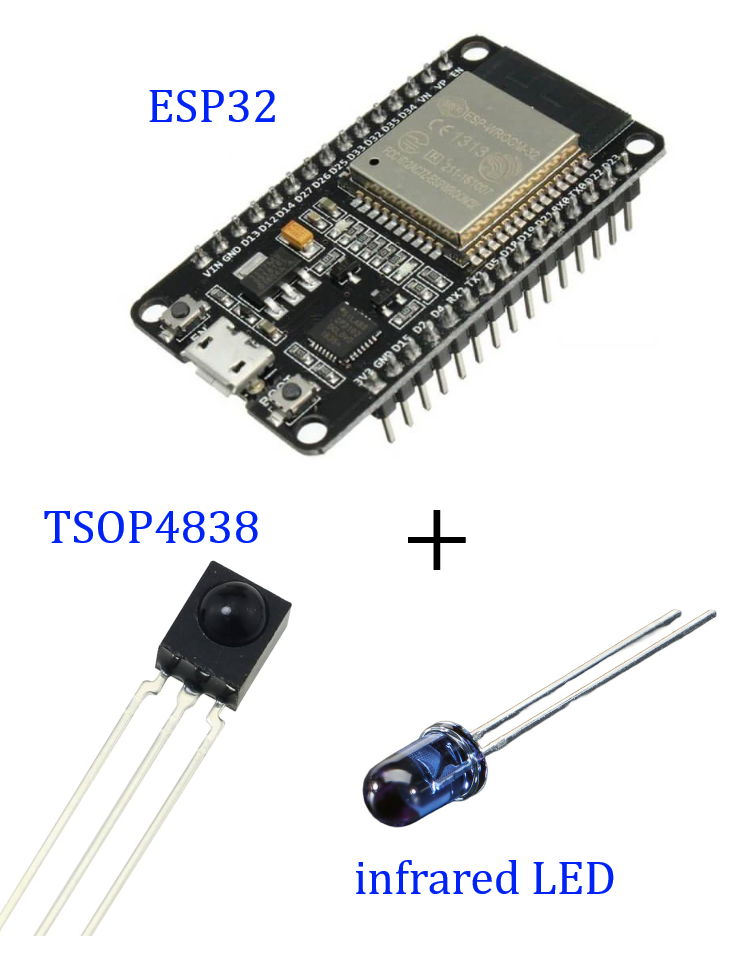
ESP32 (EP.6) วันนี้จะขอเสนอการใช้ ESP32 กับตัวรับและส่งสัญญาณ Infrared นี่เป็นการใช้งานอีกประเภทหนึ่งที่มีประโยชน์มากโดยใช้กับตัวรับสัญญาณอินฟราเรด 38 – 40 KHz จาก remote เครื่องใช้ไฟฟ้าต่าง ๆ และแอร์ และใช้ ESP32 + Infrared LED เพื่อส่งสัญญาณแทนการใช้ remote control ไปควบคุมอุปกรณ์อะไรก็ได้ในบ้าน
กระทู้เก่าทั้งหมด
🛑 EP.1 แนะนำเบื้องต้นให้รู้จัก ESP32
https://pantip.com/topic/44159372
🛑 EP.2 ใช้งาน ESP32 กับ web dashboard
https://pantip.com/topic/44161526
🛑 EP.3 ใช้งาน ESP32 กับ sensor ต่าง ๆ
https://pantip.com/topic/44163637
🛑 EP.4 ESP32 กับ dashboard + แจ้งเตือนผ่าน Line
https://pantip.com/topic/44165778
🛑 EP.5 ESP32 กับงาน PWM
https://pantip.com/topic/44167818
concept ในการใช้งานก็มีเพียง 2 อย่างเท่านั้นครับ
อย่างแรกก็คือเขียน Code ให้ ESP32 รับสัญญาณ infrared จากรีโมทของเครื่องใช้ไฟฟ้า / แอร์ก่อนเพื่อจะได้รู้ค่า data ของรีโมทปุ่มต่าง ๆ data และมันจะแสดงออกมาเป็นชุดข้อมูลเรียกว่า Protocol ซึ่ง ESP32 จะมี library อยู่ตัวหนึ่งคือ IRremoteESP8266 library ตัวนี้จะรวบรวมเอา protocol ของรีโมทเครื่องใช้ไฟฟ้ากว่า 100 แบรนด์เกือบ 500 รุ่นเข้าไว้ใน library ตัวนี้ และเมื่อเราทดลองยิงสัญญาณจากรีโมทเครื่องใช้ไฟฟ้า/แอร์ที่บ้านเรา หากเครื่องนั้นหรือแอร์รุ่นนั้นอยู่ใน library ตัวนี้มันก็จะแสดงค่า protocol ออกมาเป็นชุด Hexadecimal (HEX) data
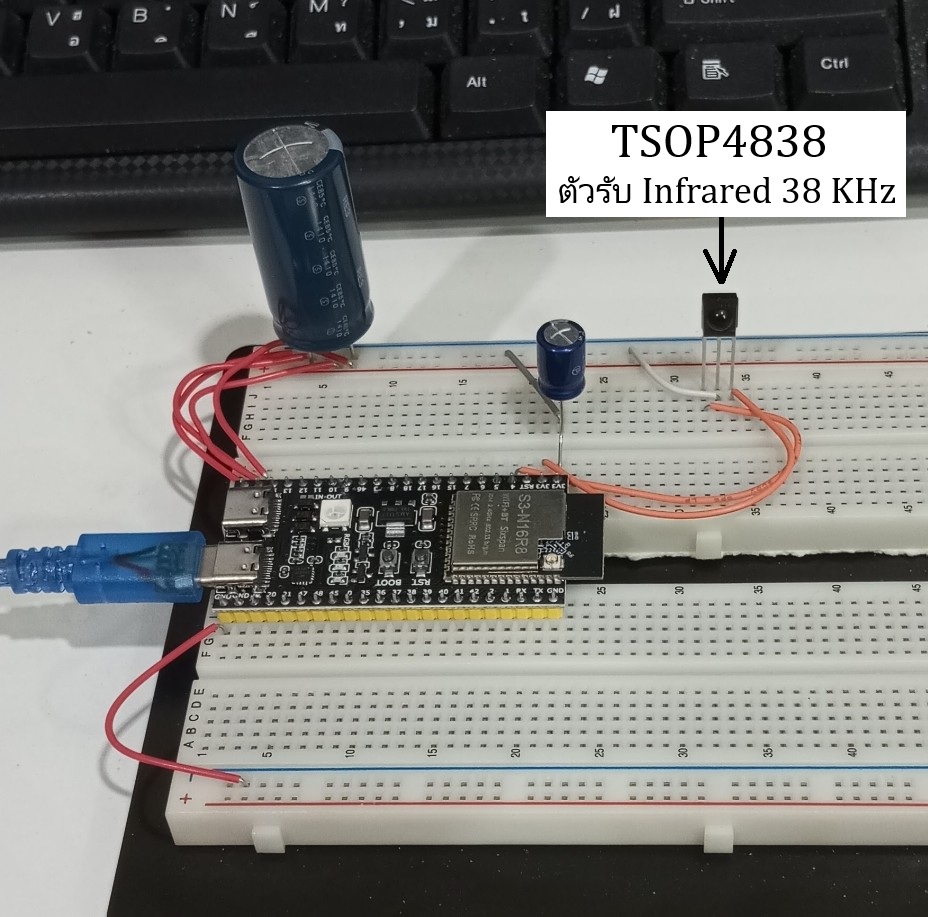
ขอเริ่มจากการใช้ตัวรับสัญญาณรีโมทความถี่ 38 KHz พร้อมกับการเขียน code สั้น ๆ …. อุปกรณ์ที่ใช้ตามภาพด้านล่างนี้เลยครับ
Code ทั้งหมดของการรับ protocol รีโมท
#include <Arduino.h>
#include <IRremoteESP8266.h>
#include <IRrecv.h>
#include <IRutils.h>

// Define the GPIO pin connected to the TSOP3848 OUT pin
const uint16_t kRecvPin = 4;

// 1024 bytes is usually enough for long AC data packets
const uint16_t kCaptureBufferSize = 1024;

// High timeout ensures the entire long AC frame is captured (in milliseconds)
const uint8_t kTimeout = 50;

// Initialize the IR receiver object
IRrecv irrecv(kRecvPin, kCaptureBufferSize, kTimeout, true);
decode_results results;

void setup() {
  Serial.begin(115200);
  while (!Serial) {
    delay(50); // Wait for Serial Monitor to connect (needed for ESP32-S3 USB)
  }

  Serial.println("\n--- ESP32-S3 AC IR Decoder Starting ---");
  irrecv.enableIRIn(); // Start the receiver
  Serial.print("Listening for IR signals on GPIO ");
  Serial.println(kRecvPin);
}
void loop() {
  if (irrecv.decode(&results)) {
    Serial.println("==========================================");

    // Check if the protocol is recognized
    if (results.decode_type != decode_type_t::UNKNOWN) {
      Serial.print("Protocol Recognized! Brand: ");
      Serial.println(typeToString(results.decode_type));
    } else {
      Serial.println("Protocol: UNKNOWN (Not explicitly supported by the library yet)");
    }

    // Display basic information
    Serial.print("Value/Hex: 0x");
    serialPrintUint64(results.value, 16);
    Serial.println();
    Serial.print("Bits: ");
    Serial.println(results.bits);

    // Output the raw data in C++ format
    Serial.println();
    Serial.println("Raw Timing Data (Use this if protocol is UNKNOWN):");
    yield(); // Prevent watchdog triggers

    // FIX: Using the correct, built-in library function here
    String sourceCode = resultToSourceCode(&results);
    Serial.println(sourceCode);

    Serial.println("==========================================\n");

    // Resume listening for the next signal
    irrecv.resume();
  }
  delay(100);
}
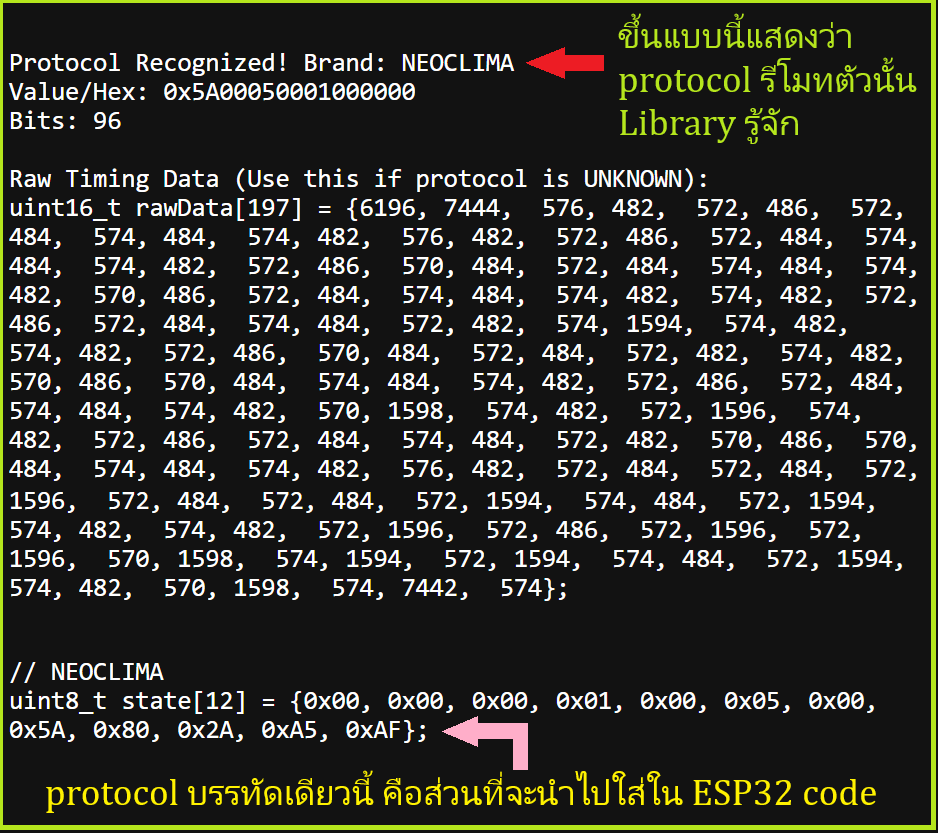
ผมทดลองใช้รีโมทของแอร์ Carrier ยิงเข้าไปผลลัพธ์ที่ได้ก็ตามภาพด้านล่าง protocol ที่อ่านได้จะมี 2 ส่วนที่สำคัญ ….
1. ส่วนแรกเรียกว่า raw data ก็คือจะเป็นชุดของตัวเลข 3 – 4 หลักหลายสิบชุด แต่ละตัวเลขคือค่าของ pulse width (หน่วย μs) ของสัญญาณ infrared ที่รีโมทตัวนั้นส่งออกมาเมื่อกดปุ่มนั้น ๆ
2. ส่วนที่ 2 คือ protocol ที่ใช้ง่ายมากก็คือเป็นตัวเลขที่เข้ารหัสแล้วเพียงบรรทัดเดียวเรียกว่า Hexadecimal (HEX) ซึ่งในการใช้งานเราก็เอาชุด HEX protocol บรรทัดเดียวนี่แหละครับไปใช้ใน code เพื่อส่งไปที่เครื่องใช้ไฟฟ้า/แอร์
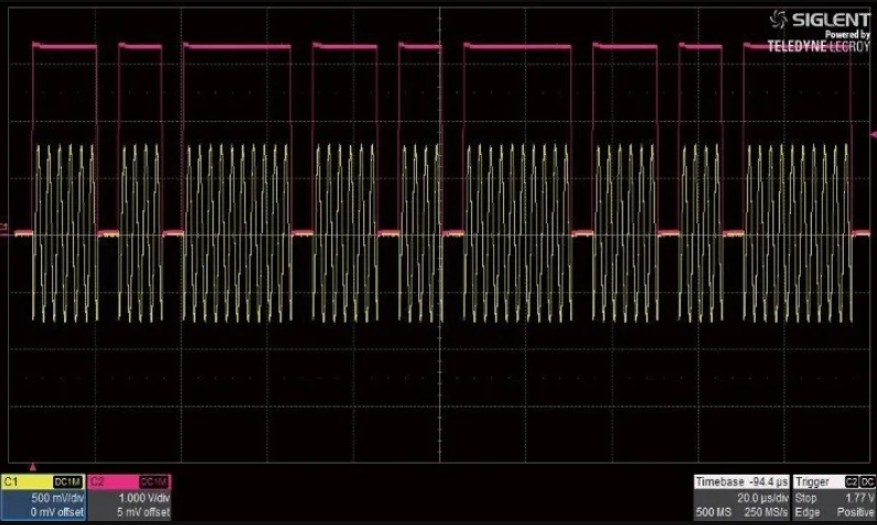
สัญญาณ infrared ที่ส่งออกจากรีโมทจะเป็นลักษณะที่เรียกว่า Pulse train คือเป็นคลื่นสี่เหลี่ยมที่มีสารพัด pulse width ต่อเนื่องกันยาวมาก ซึ่งจะส่งสั้นเพียง 0.15 – 0.25 วินาทีเท่านั้น
อย่างที่ 2 คือนำ protocol ที่รับได้จากการกดปุ่มรีโมทไปใช้ ก็คือเราก็จะต้องเอา HEX protocol ของรีโมทที่เรากดในปุ่มที่เราต้องการไปใส่ใน code อย่างเช่นกดเปิดแอร์ , กดอุณหภูมิ 26 องศา , กดพัดลมเบา …. ทุกปุ่มที่เรากดมันก็จะให้ตัว protocol ที่แตกต่างกัน การใช้งานในลักษณะเช่นนี้ก็คือสั่งเปิดเครื่องใช้ไฟฟ้าใด ๆ จากนอกบ้าน อย่างเช่นเรากำลังเดินทางกลับบ้านอากาศร้อนมากอยากจะเปิดแอร์ก็เพียงแค่หยิบมือถือขึ้นมาแล้วสั่งเปิดแอร์จาก web dashboard ในมือถือของเรา และตัว ESP32 ที่บ้านก็จะส่งสัญญาณ protocol จาก infrared LED ไปที่แอร์เพื่อสั่งให้แอร์เปิด
ใน project ที่จะสาธิตนี้อุปกรณ์ที่ใช้เป็นไปตามภาพด้านล่างนี้ครับ
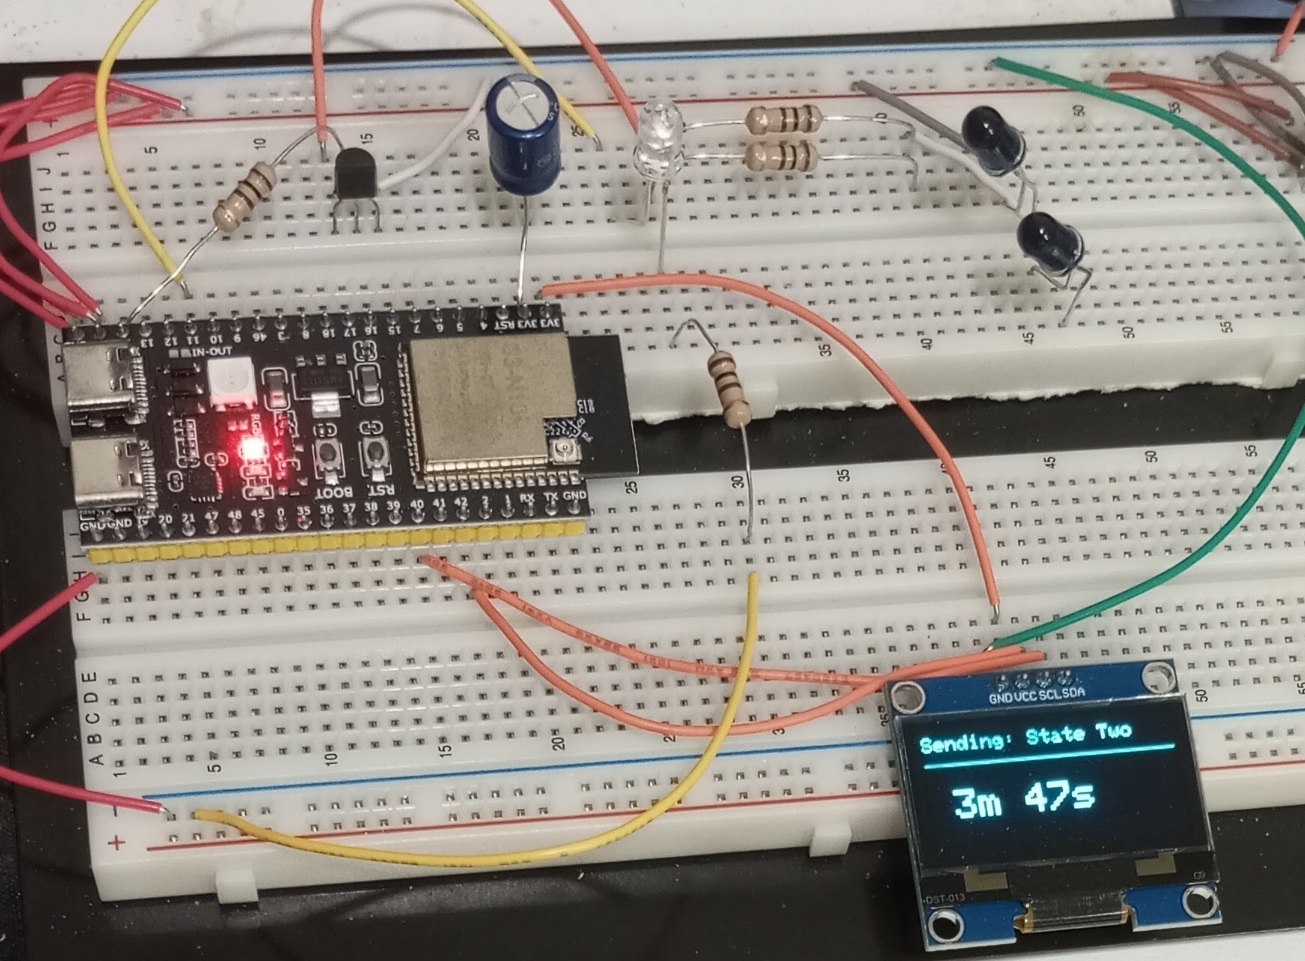
นี่คือคลิปที่สาธิตให้ดูว่า ESP32 สามารถส่งสัญญาณ infrared protocol จาก infrared LED เพื่อควบคุมแอร์แทนการกดรีโมทจริง ๆ ได้ …. ในคลิปหลังจากไฟสีแดงกระพริบ 9 ครั้งแล้วให้สังเกตที่ infrared LED 2 ตัวจะเห็นว่ามีจุดสว่างจาง ๆ ขึ้นแว้บนึง นั่นก็คือมันส่งคลื่นแสงอินฟราเรดไปที่แอร์และเราจะได้ยินเสียงแอร์ทำงานดัง “ตี๊ด” ซึ่งปกติเราดวงตาจะมองไม่เห็นแสง infrared ที่ส่งจาก infrared LED นี้ แต่กล้องมือถือสามารถเห็นได้แบบจาง ๆ
Code ทั้งหมด
#include <Arduino.h>
#include <Wire.h>
#include <Adafruit_GFX.h>
#include <Adafruit_SH110X.h>
#include <IRremoteESP8266.h>
#include <IRsend.h>
#include <ir_Neoclima.h>

// OLED Display Configuration
#define SCREEN_WIDTH 128
#define SCREEN_HEIGHT 64
#define OLED_RESET     -1 // Share reset pin or set to -1 if not used
Adafruit_SH1106G display = Adafruit_SH1106G(SCREEN_WIDTH, SCREEN_HEIGHT, &Wire, OLED_RESET);

// Hardware Pins
const uint16_t kIrLedPin = 14;
const uint16_t kIndicatorLedPin = 11;
const int I2C_SDA_PIN = 40;
const int I2C_SCL_PIN = 42;

IRNeoclimaAc neoclimaAC(kIrLedPin);

// Intervals in milliseconds
const unsigned long INTERVAL_STATE_1_TO_2 = (3 * 60) * 1000UL;
const unsigned long INTERVAL_STATE_2_TO_1 = (9 * 60) * 1000UL;

bool isCurrentStateOne = true;
unsigned long previousMillis = 0;
unsigned long lastOledUpdateMillis = 0;

// Raw 12-byte states captured from the original remote control
uint8_t rawStateOne[12] = {0x00, 0x00, 0x00, 0x01, 0x00, 0x03, 0x00, 0x7A, 0x80, 0x2A, 0xA5, 0xCD};
uint8_t rawStateTwo[12] = {0x00, 0x00, 0x00, 0x01, 0x00, 0x02, 0x00, 0x7A, 0x80, 0x2D, 0xA5, 0xCF};

// Function declarations
void sendStateOne();
void sendStateTwo();
void flashLED();
void updateOLEDCountdown(unsigned long elapsed, unsigned long totalDuration, const char* stateName);

void setup() {
  pinMode(kIndicatorLedPin, OUTPUT);

  // Initialize Custom I2C Pins for ESP32-S3
  Wire.begin(I2C_SDA_PIN, I2C_SCL_PIN);

  // Initialize SH1106 OLED (Address 0x3C is common for these modules)
  if(!display.begin(0x3C, true)) {
    // If initialization fails, loop infinitely or handle error
    while(true);
  }

  display.clearDisplay();
  display.setTextColor(SH110X_WHITE);
  display.display();

  neoclimaAC.begin();

  // Initial transmission
  sendStateOne();
  previousMillis = millis();
  updateOLEDCountdown(0, INTERVAL_STATE_1_TO_2, "State One");
}

void loop() {
  unsigned long currentMillis = millis();
  unsigned long currentInterval = isCurrentStateOne ? INTERVAL_STATE_1_TO_2 : INTERVAL_STATE_2_TO_1;
  unsigned long elapsedMillis = currentMillis - previousMillis;

  // Update the countdown display once every second
  if (currentMillis - lastOledUpdateMillis >= 1000UL) {
    lastOledUpdateMillis = currentMillis;

    // Prevent elapsed from exceeding total interval before state switch clears it
    if (elapsedMillis > currentInterval) elapsedMillis = currentInterval;

    updateOLEDCountdown(elapsedMillis, currentInterval, isCurrentStateOne ? "State One" : "State Two");
  }

  // State switching logic
  if (isCurrentStateOne) {
    if (elapsedMillis >= INTERVAL_STATE_1_TO_2) {
      sendStateTwo();
      isCurrentStateOne = false;
      previousMillis = currentMillis;
      lastOledUpdateMillis = currentMillis;
      updateOLEDCountdown(0, INTERVAL_STATE_2_TO_1, "State Two");
    }
  } else {
    if (elapsedMillis >= INTERVAL_STATE_2_TO_1) {
      sendStateOne();
      isCurrentStateOne = true;
      previousMillis = currentMillis;
      lastOledUpdateMillis = currentMillis;
      updateOLEDCountdown(0, INTERVAL_STATE_1_TO_2, "State One");
    }
  }
}

void updateOLEDCountdown(unsigned long elapsed, unsigned long totalDuration, const char* stateName) {
  long remainingSeconds = (totalDuration - elapsed) / 1000UL;
  if (remainingSeconds < 0) remainingSeconds = 0;

  int minutes = remainingSeconds / 60;
  int seconds = remainingSeconds % 60;

  display.clearDisplay();

  // Header: Active State
  display.setTextSize(1);
  display.setCursor(0, 4);
  display.print("Sending: ");
  display.println(stateName);

  // Visual divider line
  display.drawFastHLine(0, 18, 128, SH110X_WHITE);

  // Large Countdown Display
  display.setTextSize(2);
  display.setCursor(12, 32);

  // Format matching: "3m 30s" or "9m 0s"
  display.print(minutes);
  display.print("m ");
  display.print(seconds);
  display.print("s");

  display.display();
}

void flashLED() {
  for (int i = 0; i < 9; i++) {
    digitalWrite(kIndicatorLedPin, HIGH);
    delay(166);
    digitalWrite(kIndicatorLedPin, LOW);
    delay(167);
  }
}

void sendStateOne() {
  flashLED();
  neoclimaAC.setRaw(rawStateOne);
  neoclimaAC.send();
}

void sendStateTwo() {
  flashLED();
  neoclimaAC.setRaw(rawStateTwo);
  neoclimaAC.send();
}